On windows open cmd and copy the folder location from top of the file browser.
On cmd type cd “then paste the location” and enter
Do in the cmd npm i discord.js to install discord.js
Before you do the install command make sure the cmd window is in the right folder
what is the api used to connect to Discord.
Getting this bot and starting it:
Download this project as a zip file then move the zip file to the folder you created
Unzip it there then put token in the config.json to get a token goto Discord Developer Site link below
After you have token in config.json and have installed discord.js you can start bot by typing node app.js
In the branch experiments I’m trying to improve some points, for example: removing the update AJAX call on DOM ready, calling it only before a form submit
In the update route the CSRF token is available to anyone, this could be a security risk (in this sample project it’s used only for testing); an alternative could be to disable CSRF protection for cached routes using a good reCAPTCHA instead, another option is to disable caching for routes with forms
Project setup
rails g model Author name:string age:integer email:string
rails g model Post title:string description:text author:belongs_to category:string dt:datetime position:float published:boolean
rails g model Detail description:text author:belongs_to
rails g model Tag name:string
rails g model PostTag post:belongs_to tag:belongs_to
Serve static assets
rails assets:clean assets:precompile
rails cache:generate_all
rails server -b 0.0.0.0
To compile the code, first, make sure CMake is installed.
To build the library on Linux or macOS:
mkdir build
cd build
cmake .. -DCMAKE_BUILD_TYPE=Release
make -j4
Then you can run a CCD example:
./app/Tight_Inclusion_bin
Optional
We also provide an example that tests sample queries using our CCD method. This requires installing gmp on your system before compiling the code. Set the CMake option TIGHT_INCLUSION_WITH_SAMPLE_QUERIES to ON when compiling:
cmake .. -DCMAKE_BUILD_TYPE=Release -DTIGHT_INCLUSION_WITH_SAMPLE_QUERIES=ON
make -j4
Then you can run ./app/Tight_Inclusion_bin to test the handcrafted and simulation queries in the Sample Queries.
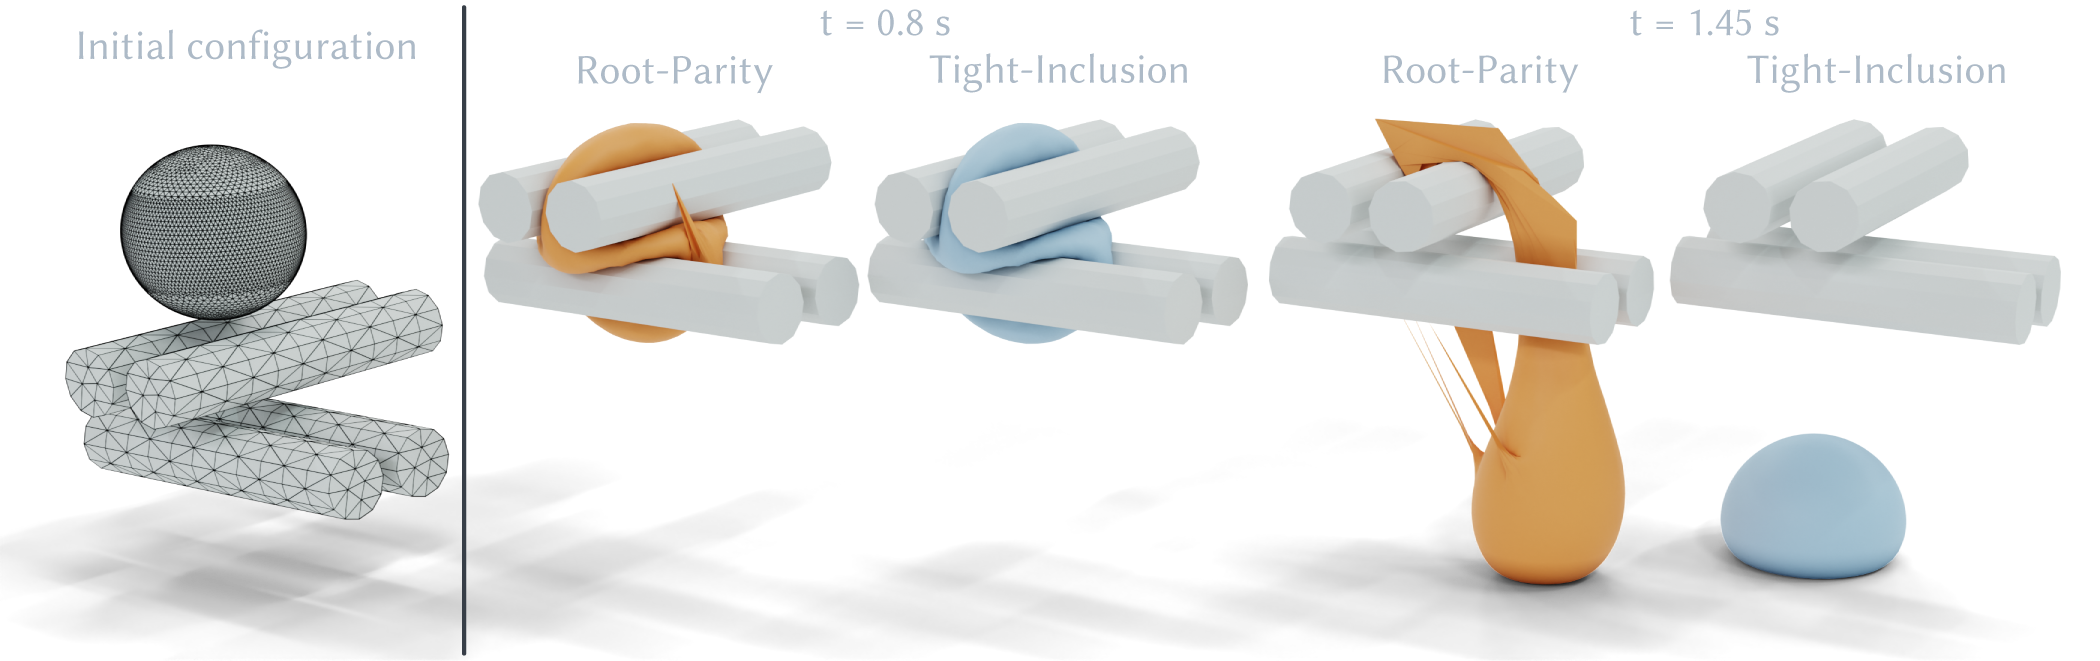
💡 Each CCD function returns a boolean result corresponding to if a collision is detected. Because our method is conservative, we guarantee a result of false implies no collision occurs. If the result is true, there may not be a collision but we falsely report a collision. However, we can guarantee that this happens only if the minimal distance between the two primitives in this time step is no larger than tolerance + ms + err (see below for a description of these parameters).
Parameters
For both vertex-face and edge-edge CCD, the input query is given by eight vertices which are in the format of Eigen::Vector3d. Please read our code in tight_inclusion/ccd.hpp for the correct input order of the vertices.
Besides the input vertices, there are some input and output parameters for users to tune the performance or to get more information from the CCD.
Here is a list of the explanations of the parameters:
Input
err: The numerical filters of the $x$, $y$ and $z$ coordinates. It measures the errors introduced by floating-point calculation when solving inclusion functions.
ms: A minimum separation distance (no less than 0). We guarantee a collision will be reported if the distance between the two primitives is less than ms.
tolerance: User-specific solving precision. It is the target maximal $x$, $y$, and $z$ length of the inclusion function. We suggest the to use 1e-6.
t_max: The time range $[0, t_{\max}]$ where we detect collisions. Since the input query implies the motion is in time interval $[0, 1]$, t_max should not be larger than 1.
max_itr: The maximum number of iterations our inclusion-based root-finding algorithm can take. This enables early termination of the algorithm. If you set max_itr < 0, early termination will be disabled, but this may cause longer running times. We suggest setting max_itr = 1e6.
no_zero_toi: For simulators which use non-zero minimum separation distance (ms > 0) to make sure intersection-free for each time-step, we have the option no_zero_toi to avoid returning a collision time toi of 0. The code will continue the refinement in higher precision if the output toi is 0 under the given tolerance, so the eventual toi will not be 0.
CCD_TYPE: Enumeration of possible CCD schemes. The default and recommended type is BREADTH_FIRST_SEARCH. If set DEPTH_FIRST_SEARCH, the code will switch to a naive conservative CCD algorithm but lacks our advanced features.
Output
toi: The time of impact. If multiple collisions happen in this time step, it will return the earliest collision time. If there is no collision, the returned toi value will be std::numeric_limits<double>::infinity().
output_tolerance: The resulting solve’s precision. If early termination is enabled, the solving precision may not reach the target precision. This parameter will return the resulting solving precision when the code is terminated.
Tips
💡 The input parameter err is crucial to guarantee our algorithm is a conservative method not affected by floating-point rounding errors. To run a single query, you can set err = Eigen::Array3d(-1, -1, -1) to enable a sub-function to calculate the real numerical filters when solving CCD. If you are integrating our CCD in simulators, you need to:
Include the headler: #include <tight_inclusion/interval_root_finder.hpp>.
Use the parameter err_ee each time you call bool ticcd::edgeEdgeCCD() and err_vf when you call bool ticcd::vertexFaceCCD().
The parameters for function ticcd::get_numerical_error() are:
vertices: Vertices of the axis-aligned bounding box of the simulation scene. Before you run the simulation, you need to conservatively estimate the axis-aligned bounding box in which the meshes will be located during the whole simulation process, and the vertices should be the corners of the AABB.
is_vertex_face: A boolean flag corresponding to if you are checking vertex-face or edge-edge CCD.
using_minimum_separation: A boolean flag corresponding to if you are using minimum-separation CCD (the input parameter ms > 0).
To better understand or to get more details of our Tight-Inclusion CCD algorithm, please refer to our paper.
Citation
If you use this work in your project, please consider citing the original paper:
@article{Wang:2021:Benchmark,
    title        = {A Large Scale Benchmark and an Inclusion-Based Algorithm for Continuous Collision Detection},
    author       = {Bolun Wang and Zachary Ferguson and Teseo Schneider and Xin Jiang and Marco Attene and Daniele Panozzo},
    year         = 2021,
    month        = oct,
    journal      = {ACM Transactions on Graphics},
    volume       = 40,
    number       = 5,
    articleno    = 188,
    numpages     = 16
}
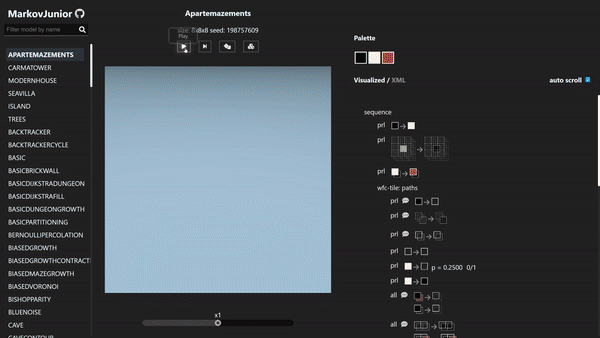
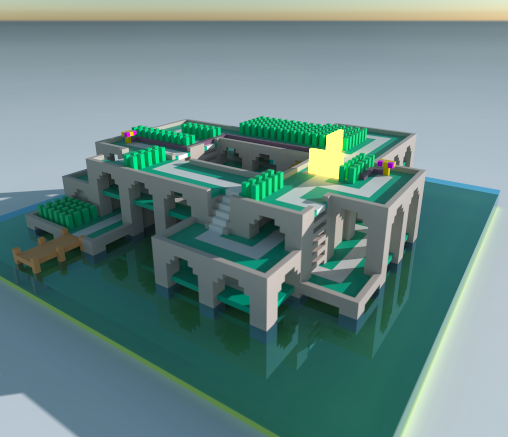
Everything have been implemented including isometric rendering, exporting the output as a .vox file, and node tree visualization.
Every model from the original repository can be loaded with this project, but the output would be different due to different random seed implementation (dotnet builtin vs seededrandom).
Development
Install dependensies: npm i
Start development server on localhost: npm start
Build static site: npm build
Run in node (writes result to /output): npm run cli
Random Notes
I want to implement markovjunior in UE 5.2 as a plugin to the PCG component. MarkovJunior can be integrated as a special typed subgraph. UE 5.2 PCG is very data oriented – everything in a table where row is element and column is attributes. MarkovJunior output 2D/3D grid can be flattened to this table where row is pixel/voxel and column is the value. The result can be quite powerful, static mesh actors can be placed correspond to the output, graphs can be nested so the final output can be very detailed and hierarchical, and grid patterns can be broken as well by varying transforms to the gragh or generated actors. The only downside is this would take a lot of time and UE 5.2 is still in preview.
This port is around 2x slower than the original repo (JS vs C#), but it doesn’t affect the page much; even with 200 steps per frame there’s hardly any FPS drop on most models. However, the slowdown is quite noticable on computation expensive calculations, e.g. uni/bi-direction inference.
SokobanLevel1 takes ~10 seconds for the original C# code on my pc to reach the desired state, while it takes 20+ seconds on the web. I’ve tried JIT/unroll the rules into webassembly with generated AssemblyScript and it actually works: it gains a x2 speedup and the performance almost match the native C# version. The only problem is the load & compile time is terrilbe and it’s incredibly hard to debug WebAssembly. I rolled back the commits on main and put the experimental stuff in the optimization branch, but I’m still pretty proud of this MarkovJunior rules -> AssemblyScript -> Wasm “JIT” compiler I wrote.
Update: I wrote a precompiled wasm version and it works fine, and the runtime is reduced from 20+ seconds on SokobanLevel1 to ~13 seconds (not too bad I guess ¯\_(ツ)_/¯ ).
This permits the use of JSBSim models from with DCS World;
There must be a config file in the root of your mod; “aceFMconfig.xml” that sets the basic data (properties) and defines which JSBSim XML file to use. Usually the JSBSim XML will include other files (e.g. engines, systems).
acEFM supports the mapping between properties and the cockpit API (pfn_ed_cockpit_update_parameter_with_number(Handle, val);
Nodes as follows
<param> node defines the Handle to lookup
<property> where the value comes from
<factor> optional fixed factor to apply
<delta> the amount the property must change before an update is trigged (optional, default 0.0001)
<type> defines the type of the node which defines how the property value is handled prior to setting the value on the handle. Currently supported is the default type (nothing special) or GenevaDrive which will animation a Geneva Drive for instrument drums. LinearDrive is a linear drive. Only the default type is currently fully implemented.
The main config files is c:\users\YOU\Saved Games\DCS.openbeta\Mods\Aircraft\YOURMODEL\aceFMconfig.xml. This defines all of the basic properties that the JSBSim XML requires and is where you can define what the draw arguments and cockpit animations.
JSBSim XML files
EFM/YOURMODEL.xml
EFM/engines/
EFM/systems/
e.g.
efm\Engines
efm\Systems
efm\YOURMODEL-main-jsb.xml
efm\Engines\direct.xml
efm\Engines\YOURENGINE.xml
efm\Systems\YOURFCS.xml
efm\Systems\other-system.xml
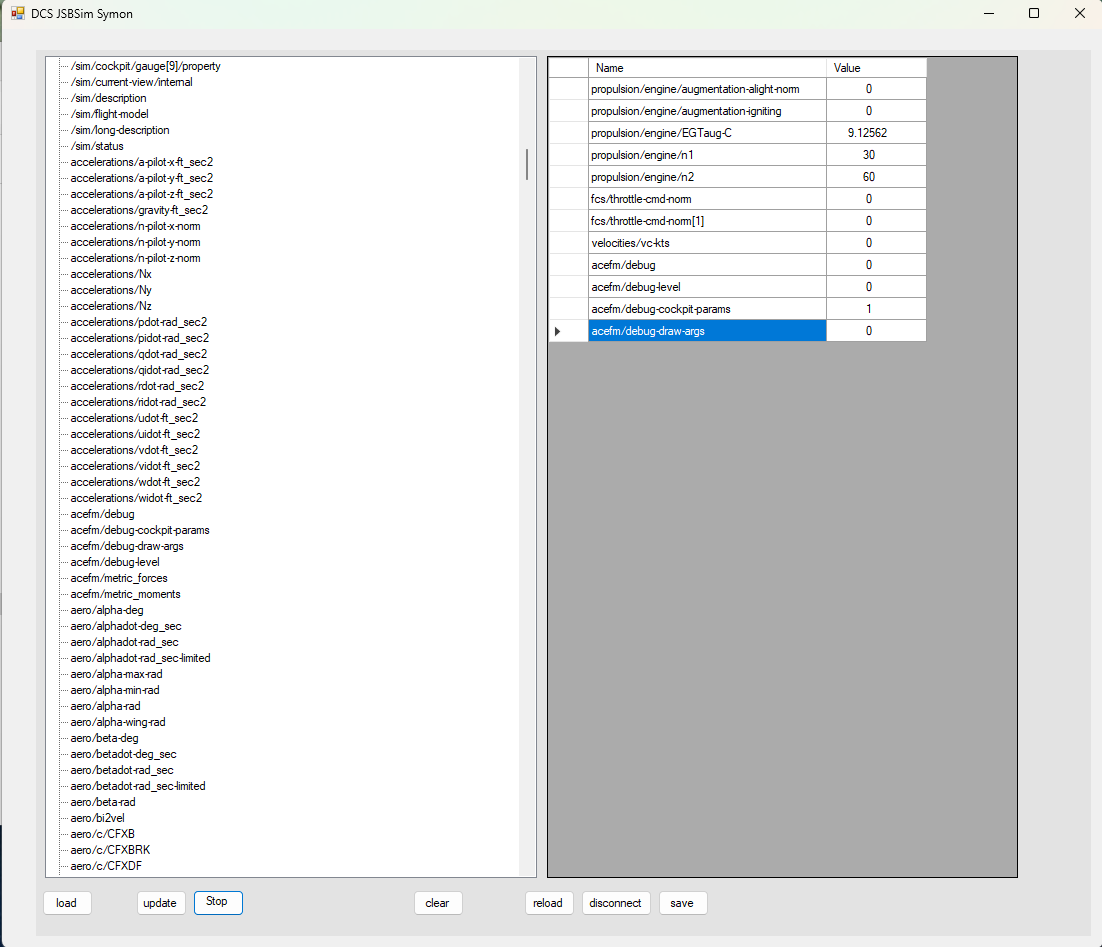
SYMON
Symon permits the inspection and modifications of all properties at run time. Your EFM\jsbsim-model.xml must have the following
<input port="1137"/>
Symon must be connected after DCS has loaded your model (and the debug window has appeared). Once connected you should use the “reload” button to populate the list of properties. Once populated you can double click a property on the left window to include it on the right.
Implementation of useful data types in typescript that are available in other languages.
💡 Current data types
A complete suite of test covering the different methods is provided. Multiple operations are attached for each one of the data types. It is recommended to give an overview to the documentation of the implemented operations. Following, a small description an example of usage of each one of the available types.
Optional:
Java-like optional with extra operations. Encapsulates the idea of having or not a value. Similar to Maybe data type.
    const user = userRepository.get(userId)
              .map(user => user.getId())
              .orElseThrow(() => new UserNotFoundError());
Either:
Encapsulates the possibility of having only one of two values of different types, a left type and a right type. Usually right type is associated to a ‘correct’ value, while the left value is more associated to errors.
    const value = Either.right<boolean, number>(0)
              .bimap(value => +value, value => value + 1)
              .get();
Result:
Encapsulates the possibility of having an error result or a valid result. Similar to Either, but enfocing the idea of an error result being an error.
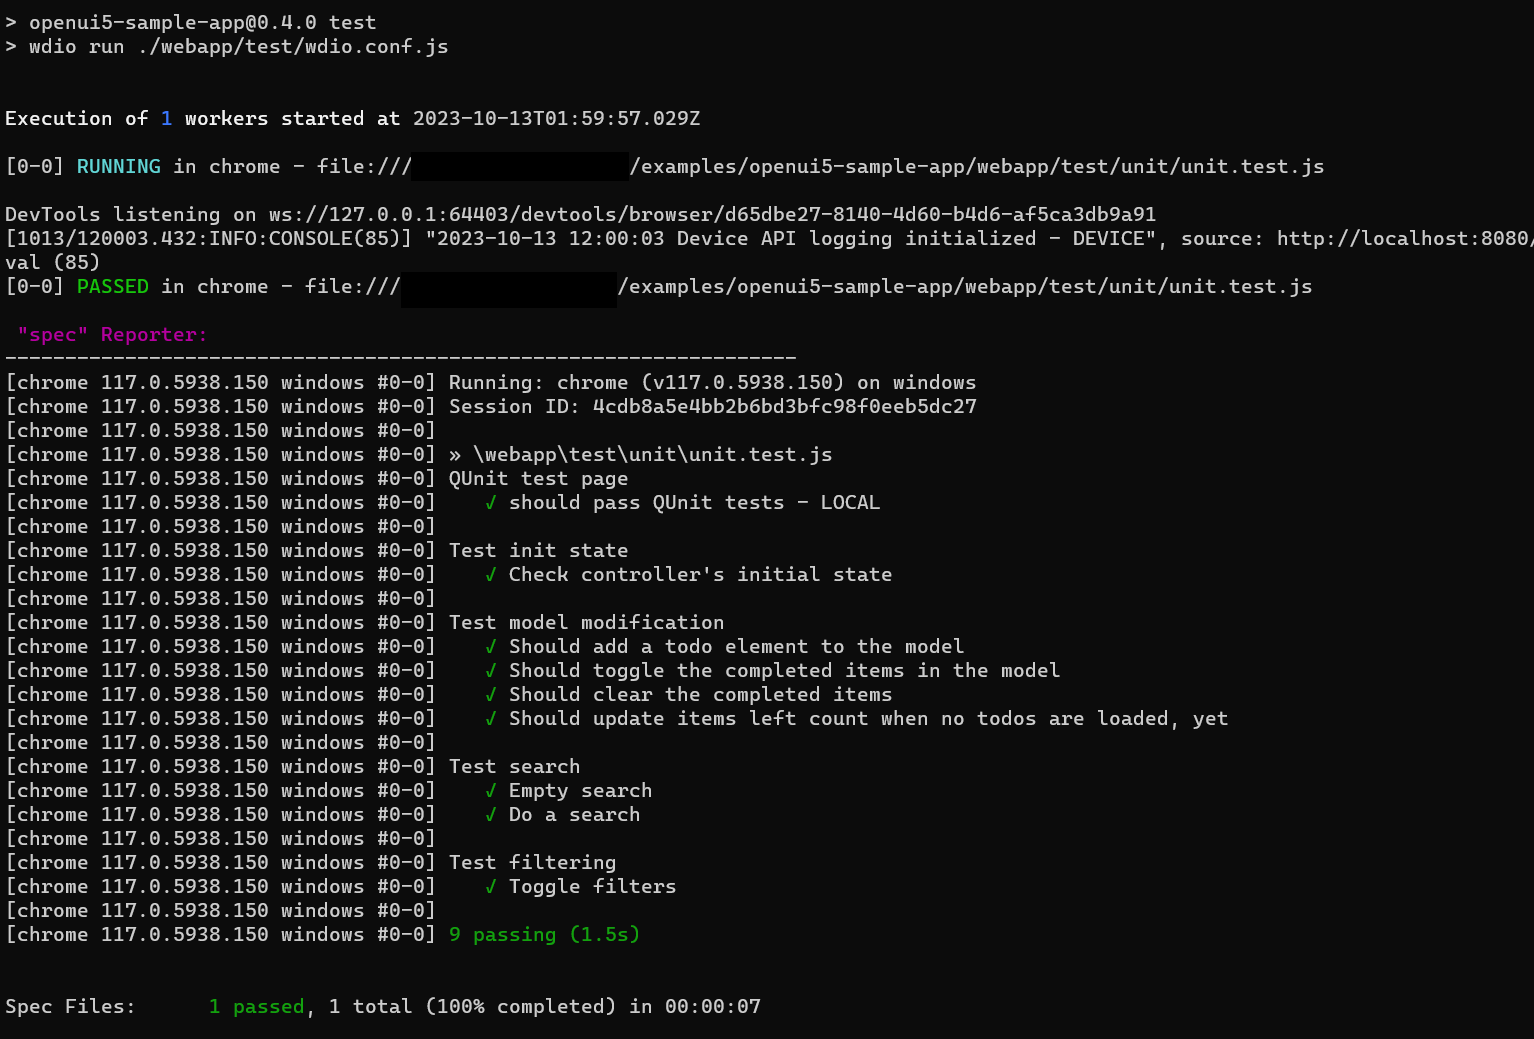
WebdriverIO (wdio) service for running QUnit browser-based tests and dynamically converting them to wdio test suites.
Replacing Karma
QUnit Service is a drop-in replacement for those using Karma JS to run their QUnit tests (karma-qunit, karma-ui5 or any other combination of Karma and QUnit). Karma is deprecated and people should move to modern alternatives!
If you want to keep your QUnit tests as they are, with no rewriting and no refactoring, QUnit Service is everything you need. It runs your QUnit HTML files in a browser and captures all the results in wdio format.
Because of that, developers can use QUnit Service in tandem with everything else available in the wdio ecosystem.
Want to record the test run in a video? Perhaps take a screenshot or save it in PDF? Check the Code coverage? Save the test results in JUnit format? Go for it, QUnit Service doesn’t get on your way.
Installation
After configuring WebdriverIO, install wdio-qunit-service as a devDependency in your package.json file.
npm install wdio-qunit-service --save-dev
If you haven’t configured WebdriverIO yet, check the official documentation out.
Configuration
In order to use QUnit Service you just need to add it to the services list in your wdio.conf.js file. The wdio documentation has all information related to the configuration file:
Make sure the web server is up and running before executing the tests. wdio will not start the web server.
With .spec or .test files
In your WebdriverIO test, you need to navigate to the QUnit HTML test page, then call browser.getQUnitResults().
describe("QUnit test page",()=>{it("should pass QUnit tests",async()=>{awaitbrowser.url("http://localhost:8080/test/unit/unitTests.qunit.html");awaitbrowser.getQUnitResults();});});
It’s recommended to have one WebdriverIO test file per QUnit HTML test page. This ensures the tests will run in parallel and fully isolated.
Configuration only, no .spec or .test files
If you don’t want to create spec/test files, you can pass a list of QUnit HTML files to the configuration and the tests will be automatically generated.
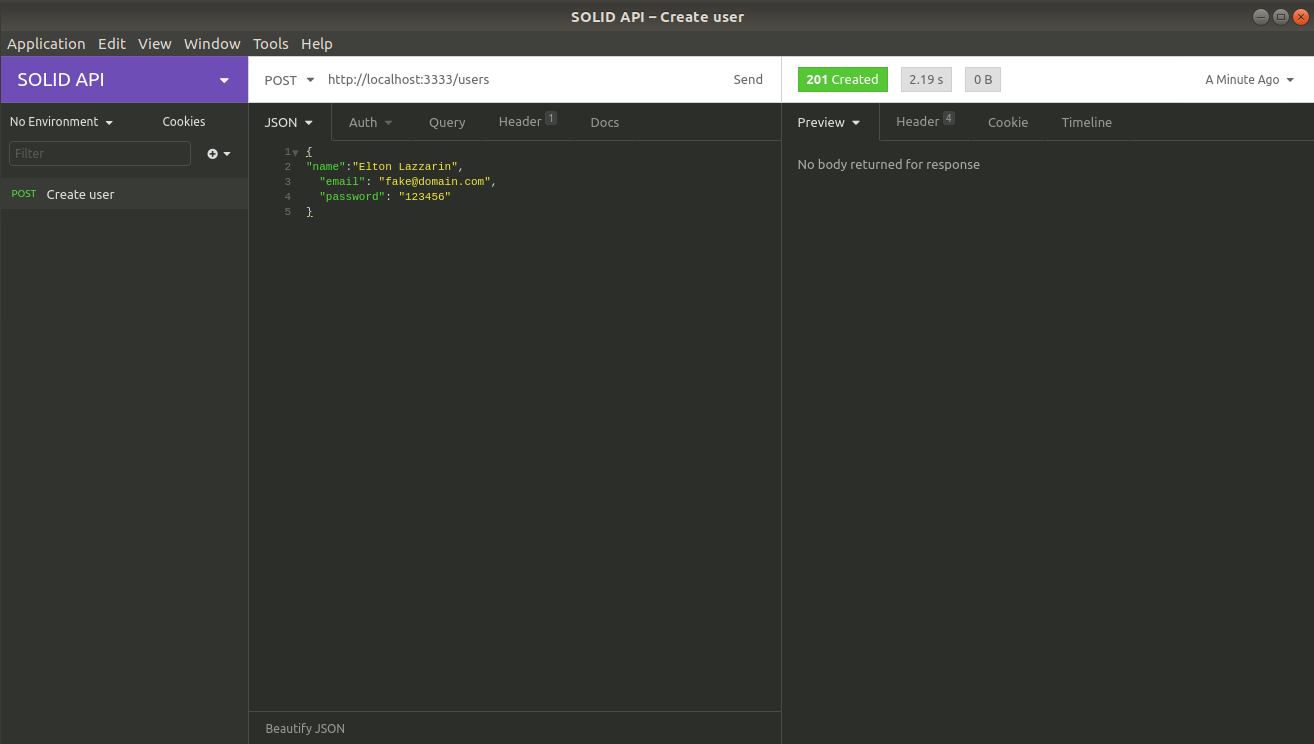
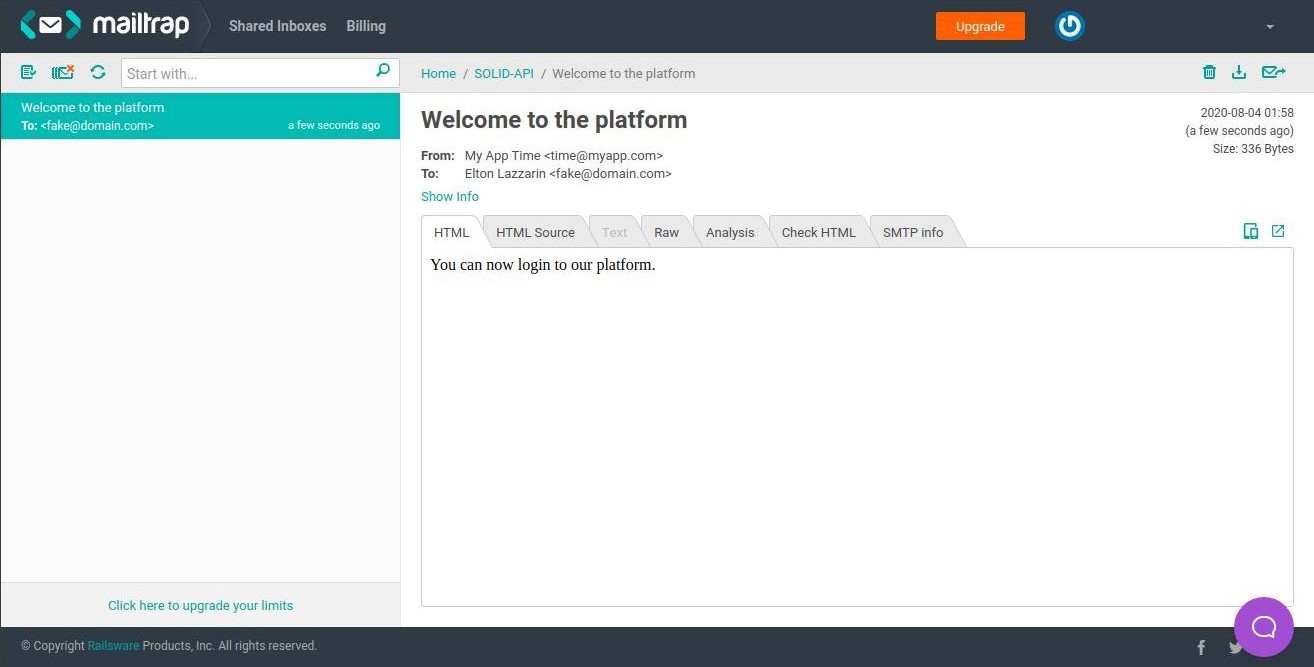
SOLID Principles is a coding standard that all developers should have a clear concept for developing software properly to avoid a bad design. It was promoted by Robert C Martin and is used across the object-oriented design spectrum. When applied properly it makes your code more extendable, logical, and easier to read.
So, I decided to study and I created a simple SOLID API with Node.js and TypeScript.
This project consists of sending welcome emails after creating a registration in the application via Insomnia.
🚀 Technologies
Main technologies that I used to develop this frontend app
$ git clone https://github.com/eltonlazzarin/solid-api.git

$ cd solid-api
Follow the steps below
# Install the dependencies
$ yarn i

# Run the web app
$ yarn start
🤔 How to contribute
Follow the steps below
# Clone your fork
$ git clone https://github.com/eltonlazzarin/solid-api.git
$ cd solid-api
# Create a branch with your feature
$ git checkout -b your-feature
# Make the commit with your changes
$ git commit -m 'feat: Your new feature'# Send the code to your remote branch
$ git push origin your-feature
After your pull request is merged, you can delete your branch
📝 License
This project is under the MIT license. See the LICENSE for more information.
CockroachDB as of v22.1 natively supports sending a changefeed to Google Pub/Sub. This repository is now archived, but will be retained for demonstration purposes.
SET CLUSTER STETING kv.rangefeed.enabled = true; if you haven’t previously enabled rangefeeds for your cluster.
CREATE CHANGEFEED FOR TABLE foo INTO 'experimental-http://127.0.0.1:13013/v1/my-topic?sharedKey=xyzzy' WITH updated;
Replace my-topic with your preferred topic name.
Check the log for progress.
Flags
      --bindAddr string        the address to bind to (default ":13013")
      --credentials string     a JSON-formatted Google Cloud credentials file (default
                               "cdc-pubsub.json")
      --dumpOnly               if true, log payloads instead of sending to pub/sub
      --gracePeriod duration   shutdown grace period (default 30s)
  -h, --help                   display this message
      --projectID string       the Google Cloud project ID
      --sharedKey strings      require clients to provide one of these secret values
      --topicPrefix string     a prefix to add to topic names
Pub/Sub Attributes
Each Pub/Sub message will be labelled with the following attributes.
table: The affected SQL table.
path: The complete path used to post the message.
Building
docker build . -t cdc-pubsub
Other endpoints
If the bridge is to be placed behind a load-balancer (e.g. in a
Kubernetes environment), there is a /healthz endpoint which always
returns OK.
Runtime profiling information is available at /debug/pprof
Security implications
The bridge server provides the option of shared key which is provided by
the CDC feed via the sharedKey query parameter. This key prevents
users from inadvertently “crossing the streams” as opposed to being a
proper security mechanism:
Any HTTP client with this shared key can effectively post arbitrary
messages to any Pub/Sub topic that the bridge’s service account has
access to.
Any SQL user that can execute the SHOW JOBS command can view the shared key.
Any user that can view the Jobs page in the Admin UI can view the shared key.
The shared key will likely appear unobfuscated in CockroachDB logs.
Seamless rotation of shared keys is possible by passing multiple --sharedKey arguments to the bridge server.
Google Cloud IAM restrictions can be added to the role account to limit
the names of the Pub/Sub topics that it may access.
Deployment strategy
Given the lightweight nature of the bridge server and the above security
limitations, users should deploy this server as a “sidecar” alongside
each of their CockroachDB nodes, bound only to a loopback IP address via
the --bindAddr flag.
If the bridge is to be deployed as a traditional network service, it
should be placed behind a TLS loadbalancer with appropriate firewall
rules.
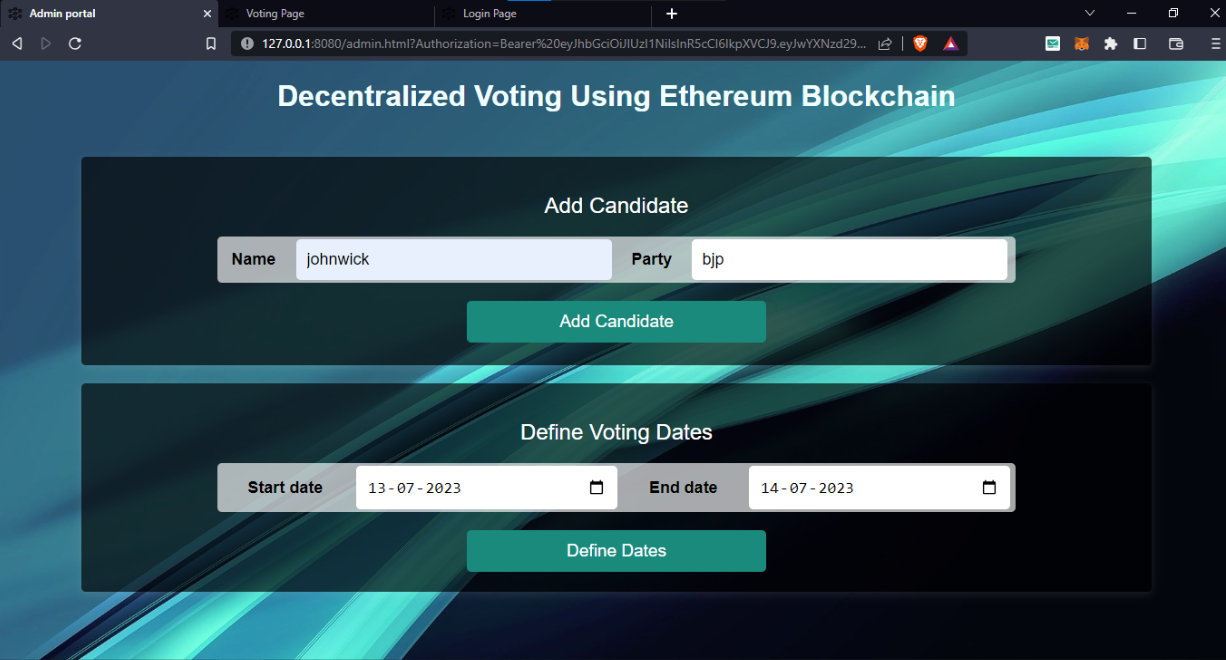
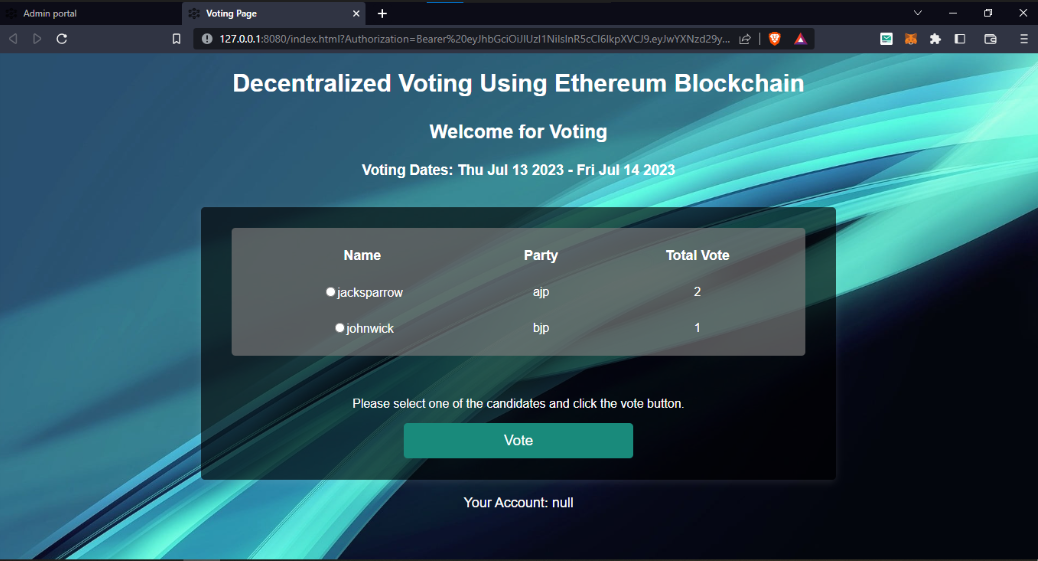
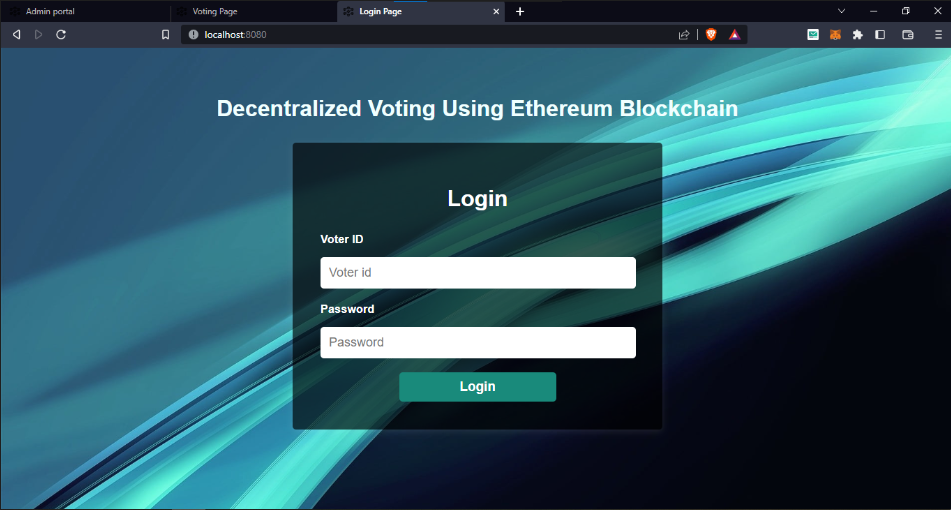
The Decentralized Voting System using Ethereum Blockchain is a secure and transparent solution for conducting elections. Leveraging Ethereum’s blockchain technology, this system ensures tamper-proof voting records, enabling users to cast their votes remotely while maintaining anonymity and preventing fraud.