Author: c7vm149f0m8o

  • terraform-aws-cloudtrail-to-slack

    FivexL

    Terraform module to deploy lambda that sends notifications about AWS CloudTrail events to Slack

    Why this module?

    This module allows you to get notifications about:

    • actions performed by root account (According to AWS best practices, you should use root account as little as possible and use SSO or IAM users)
    • API calls that failed due to lack of permissions to do so (could be an indication of compromise or misconfiguration of your services/applications)
    • console logins without MFA (Always use MFA for you IAM users or SSO)
    • track a list of events that you might consider sensitive. Think IAM changes, network changes, data storage (S3, DBs) access changes. Though we recommend keeping that to a minimum to avoid alert fatigue
    • define sophisticated rules to track user-defined conditions that are not covered by default rules (see examples below)
    • send notifications to different Slack channels based on event account id

    This module also allows you to gain insights into how many access-denied events are occurring in your AWS Organization by pushing metrics to CloudWatch.

    Example message

    Example message

    Configurations

    The module has three variants of notification delivery:

    Slack App (Recommended)

    • Offers additional features, such as consolidating duplicate events into a single message thread. More features may be added in the future.
    • The Slack app must have the chat:write permission.
    • Terraform configuration example

    Slack Webhook

    • Provides all the basic functionality of the module, but does not offer additional features and is not recommended by Slack.
    • Terraform configuration example

    AWS SNS

    • An optional feature that allows sending notifications to an AWS SNS topic. It can be used alongside either the Slack App or Slack Webhook.

    All three variants of notification delivery support separating notifications into different Slack channels or SNS topics based on event account ID.

    Rules

    Rules are python strings that are evaluated in the runtime and should return the bool value, if rule returns True, then notification will be sent to Slack.

    This module comes with a set of predefined rules (default rules) that users can take advantage of:

    Default rules:

    # Notify if someone logged in without MFA but skip notification for SSO logins
    default_rules.append('event["eventName"] == "ConsoleLogin" '
                         'and event.get("additionalEventData.MFAUsed", "") != "Yes" '
                         'and "assumed-role/AWSReservedSSO" not in event.get("userIdentity.arn", "")')
    # Notify if someone is trying to do something they not supposed to be doing but do not notify
    # about not logged in actions since there are a lot of scans for open buckets that generate noise
    default_rules.append('event.get("errorCode", "").endswith(("UnauthorizedOperation"))')
    default_rules.append('event.get("errorCode", "").startswith(("AccessDenied"))'
                         'and (event.get("userIdentity.accountId", "") != "ANONYMOUS_PRINCIPAL")')
    # Notify about all non-read actions done by root
    default_rules.append('event.get("userIdentity.type", "") == "Root" '
                         'and not event["eventName"].startswith(("Get", "List", "Describe", "Head"))')
    
    # Catch CloudTrail disable events
    default_rules.append('event["eventSource"] == "cloudtrail.amazonaws.com" '
                         'and event["eventName"] == "StopLogging"')
    default_rules.append('event["eventSource"] == "cloudtrail.amazonaws.com" '
                         'and event["eventName"] == "UpdateTrail"')
    default_rules.append('event["eventSource"] == "cloudtrail.amazonaws.com" '
                         'and event["eventName"] == "DeleteTrail"')
    # Catch cloudtrail to slack lambda changes
    default_rules.append('event["eventSource"] == "lambda.amazonaws.com" '
                         'and "responseElements.functionName" in event '
                         f'and event["responseElements.functionName"] == "{function_name}" '
                         'and event["eventName"].startswith(("UpdateFunctionConfiguration"))')
    default_rules.append('event["eventSource"] == "lambda.amazonaws.com" '
                         'and "responseElements.functionName" in event '
                         f'and event["responseElements.functionName"] == "{function_name}" '
                         'and event["eventName"].startswith(("UpdateFunctionCode"))')

    Cloudwatch metrics

    By default, every time Lambda receives an AccessDenied event, it pushes a TotalAccessDeniedEvents metric to CloudWatch. This metric is pushed for all access-denied events, including events ignored by rules. To separate ignored events from the total, the module also pushes a TotalIgnoredAccessDeniedEvents metric to CloudWatch. Both metrics are placed in the CloudTrailToSlack/AccessDeniedEvents namespace. This feature allows you to gain more insights into the number and dynamics of access-denied events in your AWS Organization.

    This functionality can be disabled by setting push_access_denied_cloudwatch_metrics to false.

    User defined rules to match events

    Rules must be provided as a list of strings, each separated by a comma or a custom separator. Each string is a Python expression that will be evaluated at runtime. By default, the module will send rule evaluation errors to Slack, but you can disable this by setting ‘rule_evaluation_errors_to_slack’ to ‘false’.

    Example of user-defined rules:

    locals = {
      rules = [
        # Catch CloudTrail disable events
        "event['eventSource'] == 'cloudtrail.amazonaws.com' and event['eventName'] == 'StopLogging'"
        "event['eventSource'] == 'cloudtrail.amazonaws.com' and event['eventName'] == 'UpdateTrail'"
        "event['eventSource'] == 'cloudtrail.amazonaws.com' and event['eventName'] == 'DeleteTrail'"
      ]
        rules = join(",", local.rules)
    }

    Events to track

    This is much simpler than rules. You just need a list of eventNames that you want to track. They will be evaluated as follows:

    f'"eventName" in event and event["eventName"] in {json.dumps(events_list)}'

    Terraform example:

    local{
      # EC2 Instance connect and EC2 events
      ec2 = "SendSSHPublicKey"
      # Config
      config = "DeleteConfigRule,DeleteConfigurationRecorder,DeleteDeliveryChannel,DeleteEvaluationResults"
      # All events
      events_to_track = "${local.ec2},${local.config}"
    }
    
    events_to_track = local.events_to_track

    Custom Separator for Rules

    By default, the module expects rules to be separated by commas. However, if you have complex rules that contain commas, you can use a custom separator by providing the rules_separator variable. Here’s how:

    locals {
      cloudtrail_rules = [
          ...
        ]
      custom_separator = "%"
    }
    
    module "cloudtrail_to_slack" {
      ...
      rules = join(local.custom_separator, local.cloudtrail_rules)
      rules_separator = local.custom_separator
    }

    Ignore Rules

    Note: We recommend addressing alerts rather than ignoring them. However, if it’s impossible to resolve an alert, you can suppress events by providing ignore rules.

    Ignore rules have the same format as the rules, but they are evaluated before them. So, if an ignore rule returns True, then the event will be ignored and no further processing will be done.

    locals {
      ignore_rules = [
        # Ignore events from the account "111111111".
        "'userIdentity.accountId' in event and event['userIdentity.accountId'] == '11111111111'",
      ]
      ignore_rules = join(",", local.ignore_rules)
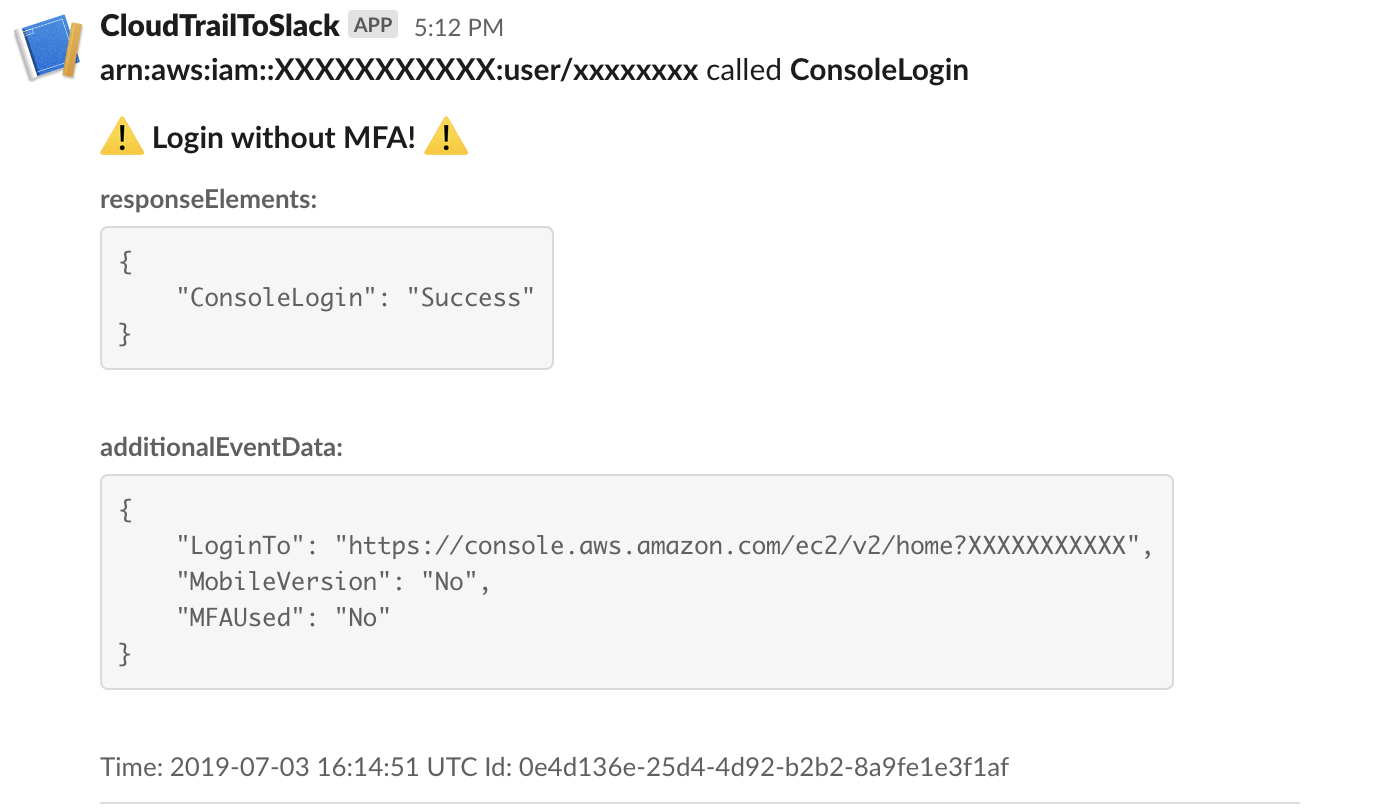
    }

    About processing Cloudtrail events

    CloudTrail event (see format here, or find more examples in src/tests/test_events.json) is flattened before processing and should be referenced as event variable So, for instance, to access ARN from the event below, you should use the notation userIdentity.arn

    {
      "eventVersion": "1.05",
      "userIdentity": {
        "type": "IAMUser",
        "principalId": "XXXXXXXXXXX",
        "arn": "arn:aws:iam::XXXXXXXXXXX:user/xxxxxxxx",
        "accountId": "XXXXXXXXXXX",
        "userName": "xxxxxxxx"
      },
      "eventTime": "2019-07-03T16:14:51Z",
      "eventSource": "signin.amazonaws.com",
      "eventName": "ConsoleLogin",
      "awsRegion": "us-east-1",
      "sourceIPAddress": "83.41.208.104",
      "userAgent": "Mozilla/5.0 (X11; Ubuntu; Linux x86_64; rv:67.0) Gecko/20100101 Firefox/67.0",
      "requestParameters": null,
      "responseElements": {
        "ConsoleLogin": "Success"
      },
      "additionalEventData": {
        "LoginTo": "https://console.aws.amazon.com/ec2/v2/home?XXXXXXXXXXX",
        "MobileVersion": "No",
        "MFAUsed": "No"
      },
      "eventID": "0e4d136e-25d4-4d92-b2b2-8a9fe1e3f1af",
      "eventType": "AwsConsoleSignIn",
      "recipientAccountId": "XXXXXXXXXXX"
    }

    Slack App configuration:

    1. Go to https://api.slack.com/
    2. Click create an app
    3. Click From an app manifest
    4. Select workspace, click next
    5. Choose yaml for app manifest format
    display_information:
      name: CloudtrailToSlack
      description: Notifications about Cloudtrail events to Slack.
      background_color: "#3d3d0e"
    features:
      bot_user:
        display_name: Cloudtrail to Slack
        always_online: false
    oauth_config:
      scopes:
        bot:
          - chat:write
    settings:
      org_deploy_enabled: false
      socket_mode_enabled: false
      token_rotation_enabled: false
    
    1. Check permissions and click create
    2. Click install to workspace
    3. Copy Signing Secret # for slack_signing_secret module input
    4. Copy Bot User OAuth Token # for slack_bot_token module input

    Terraform specs

    Requirements

    Name Version
    terraform >= 0.13.1
    aws >= 4.8
    external >= 1.0
    local >= 1.0
    null >= 2.0

    Providers

    Name Version
    aws 5.8.0

    Modules

    Name Source Version
    cloudtrail_to_slack_dynamodb_table terraform-aws-modules/dynamodb-table/aws 3.3.0
    lambda terraform-aws-modules/lambda/aws 4.18.0

    Resources

    Name Type
    aws_lambda_permission.s3 resource
    aws_s3_bucket_notification.bucket_notification resource
    aws_sns_topic.events_to_sns resource
    aws_sns_topic_subscription.events_to_sns resource
    aws_caller_identity.current data source
    aws_iam_policy_document.s3 data source
    aws_kms_key.cloudtrail data source
    aws_partition.current data source
    aws_region.current data source
    aws_s3_bucket.cloudtrail data source

    Inputs

    Name Description Type Default Required
    aws_sns_topic_subscriptions Map of endpoints to protocols for SNS topic subscriptions. If not set, sns notifications will not be sent. map(string) {} no
    cloudtrail_logs_kms_key_id Alias, key id or key arn of the KMS Key that used for CloudTrail events string "" no
    cloudtrail_logs_s3_bucket_name Name of the CloudWatch log s3 bucket that contains CloudTrail events string n/a yes
    configuration Allows the configuration of the Slack webhook URL per account(s). This enables the separation of events from different accounts into different channels, which is useful in the context of an AWS organization.
    list(object({
    accounts = list(string)
    slack_hook_url = string
    }))
    null no
    dead_letter_target_arn The ARN of an SNS topic or SQS queue to notify when an invocation fails. string null no
    default_slack_channel_id The Slack channel ID to be used if the AWS account ID does not match any account ID in the configuration variable. string null no
    default_slack_hook_url The Slack incoming webhook URL to be used if the AWS account ID does not match any account ID in the configuration variable. string null no
    default_sns_topic_arn Default topic for all notifications. If not set, sns notifications will not be sent. string null no
    dynamodb_table_name Name of the dynamodb table, it would not be created if slack_bot_token is not set. string "fivexl-cloudtrail-to-slack-table" no
    dynamodb_time_to_live How long to keep cloudtrail events in dynamodb table, for collecting similar events in thread of one message number 900 no
    events_to_track Comma-separated list events to track and report string "" no
    function_name Lambda function name string "fivexl-cloudtrail-to-slack" no
    ignore_rules Comma-separated list of rules to ignore events if you need to suppress something. Will be applied before rules and default_rules string "" no
    lambda_build_in_docker Whether to build dependencies in Docker bool false no
    lambda_logs_retention_in_days Controls for how long to keep lambda logs. number 30 no
    lambda_memory_size Amount of memory in MB your Lambda Function can use at runtime. Valid value between 128 MB to 10,240 MB (10 GB), in 64 MB increments. number 256 no
    lambda_recreate_missing_package Description: Whether to recreate missing Lambda package if it is missing locally or not bool true no
    lambda_timeout_seconds Controls lambda timeout setting. number 30 no
    log_level Log level for lambda function string "INFO" no
    push_access_denied_cloudwatch_metrics If true, CloudWatch metrics will be pushed for all access denied events, including events ignored by rules. bool true no
    rule_evaluation_errors_to_slack If rule evaluation error occurs, send notification to slack bool true no
    rules Comma-separated list of rules to track events if just event name is not enough string "" no
    rules_separator Custom rules separator. Can be used if there are commas in the rules string "," no
    s3_notification_filter_prefix S3 notification filter prefix string "AWSLogs/" no
    s3_removed_object_notification If object was removed from cloudtrail bucket, send notification to slack bool true no
    slack_app_configuration Allows the configuration of the Slack app per account(s). This enables the separation of events from different accounts into different channels, which is useful in the context of an AWS organization.
    list(object({
    accounts = list(string)
    slack_channel_id = string
    }))
    null no
    slack_bot_token The Slack bot token used for sending messages to Slack. string null no
    sns_configuration Allows the configuration of the SNS topic per account(s).
    list(object({
    accounts = list(string)
    sns_topic_arn = string
    }))
    null no
    tags Tags to attach to resources map(string) {} no
    use_default_rules Should default rules be used bool true no

    Outputs

    Name Description
    lambda_function_arn The ARN of the Lambda Function

    License

    Apache 2 Licensed. See LICENSE for full details.

    Weekly review link

    Visit original content creator repository https://github.com/fivexl/terraform-aws-cloudtrail-to-slack
  • autodistill-gemini

    Autodistill Gemini Module

    This repository contains the code supporting the Gemini base model for use with Autodistill.

    Gemini, developed by Google, is a multimodal computer vision model that allows you to ask questions about images. You can use Gemini with Autodistill for image classification.

    You can combine Gemini with other base models to label regions of an object. For example, you can use Grounding DINO to identify abstract objects (i.e. a vinyl record) then Gemini to classify the object (i.e. say which of five vinyl records the region represents). Read the Autodistill Combine Models guide for more information.

    Note

    Using this project will incur billing charges for API calls to the Gemini API. Refer to the Google Cloud pricing page for more information and to calculate your expected pricing. This package makes one API call per image you want to label.

    Read the full Autodistill documentation.

    Installation

    To use Gemini with autodistill, you need to install the following dependency:

    pip3 install autodistill-gemini

    Quickstart

    from autodistill_gemini import Gemini
    
    # define an ontology to map class names to our Gemini prompt
    # the ontology dictionary has the format {caption: class}
    # where caption is the prompt sent to the base model, and class is the label that will
    # be saved for that caption in the generated annotations
    # then, load the model
    base_model = Gemini(
        ontology=CaptionOntology(
            {
                "person": "person",
                "a forklift": "forklift"
            }
        ),
        gcp_region="us-central1",
        gcp_project="project-name",
        model="gemini-1.5-flash"
    )
    
    # run inference on an image
    result = base_model.predict("image.jpg")
    
    print(result)
    
    # label a folder of images
    base_model.label("./context_images", extension=".jpeg")

    License

    This project is licensed under an MIT license.

    🏆 Contributing

    We love your input! Please see the core Autodistill contributing guide to get started. Thank you 🙏 to all our contributors!

    Visit original content creator repository https://github.com/autodistill/autodistill-gemini
  • tgfancy

    tgfancy

    A Fancy, Higher-Level Wrapper for Telegram Bot API

    Built on top of node-telegram-bot-api.

    Version Supported Node.js Versions

    installation:

    $ npm install tgfancy --save

    sample usage:

    const Tgfancy = require("tgfancy");
    const bot = new Tgfancy(token, {
        // all options to 'tgfancy' MUST be placed under the
        // 'tgfancy' key, as shown below
        tgfancy: {
            option: "value",
        },
    });
    
    bot.sendMessage(chatId, "text message");

    introduction:

    tgfancy is basically node-telegram-bot-api on steroids. Therefore, you MUST know how to work with node-telegram-bot-api before using this wrapper. tgfancy is a drop-in replacement!

    tgfancy provides ALL the methods exposed by TelegramBot from node-telegram-bot-api. This means that all the methods from TelegramBot are available on Tgfancy. This also includes the constructor.

    fanciness:

    Here comes the fanciness

    tgfancy adds the following fanciness:

    Have a look at the API Reference.

    feature options:

    Most of the features are enabled by default. Such a feature (enabled by default) is similar to doing something like:

    const bot = new Tgfancy(token, {
        tgfancy: {
            feature: true,  // 'true' to enable!
        },
    });

    Such a feature can be disabled like so:

    const bot = new Tgfancy(token, {
        tgfancy: {
            feature: false, // 'false' to disable!
        },
    });

    If a feature allows more options, you may pass an object, instead of true, like:

    const bot = new Tgfancy(token, {
        tgfancy: {
            feature: {          // feature will be enabled!
                key: "value",   // feature option
            },
        },
    });

    See example at example/feature-toggled.js.


    Ordered sending:

    Using an internal queue, we can ensure messages are sent, to a specific chat, in order without having to implement the wait-for-response-to-send-next-message logic.

    Feature option: orderedSending (see above)

    For example,

    bot.sendMessage(chatId, "first message");
    bot.sendMessage(chatId, "second message");

    With tgfancy, you are guaranteed that "first message" will be sent before "second message".

    Fancied functions: [ "sendAudio", "sendDocument", "sendGame", "sendInvoice", "sendLocation", "sendMessage", "sendPhoto", "sendSticker", "sendVenue", "sendVideo", "sendVideoNote", "sendVoice", ]

    An earlier discussion on this feature can be found here. See example at example/queued-up.js.


    Text paging:

    The Tgfancy#sendMessage(chatId, message) automatically pages messages, that is, if message is longer than the maximum limit of 4096 characters, the message is split into multiple parts. These parts are sent serially, one after the other.

    The page number, for example [01/10], is prefixed to the text.

    Feature option: textPaging (see above)

    For example,

    // 'veryLongText' is a message that contains more than 4096 characters
    // Usually, trying to send this message would result in the API returning
    // an error.
    bot.sendMessage(chatId, veryLongText)
        .then(function(messages) {
            // 'messages' is an Array containing Message objects from
            // the Telegram API, for each of the parts
            console.log("message has been sent in multiple pages");
        }).catch(function(error) {
            console.error(error);
        });

    Note: We do not support sending messages that’d result into more than 99 parts.

    See example at example/paging-text.js.


    Rate-Limiting:

    Any request that encounters a 429 error i.e. rate-limiting error will be retried after some time (as advised by the Telegram API or 1 minute by default). The request will be retried for a number of times, until it succeeds or the maximum number of retries has been reached

    Feature option: ratelimiting (see above)

    For example,

    const bot = new Tgfancy(token, {
        tgfancy: {
            // options for this fanciness
            ratelimiting: {
                // number of times to retry a request before giving up
                maxRetries: 10,         // default: 10
                // number of milliseconds to wait before retrying the
                // request (if API does not advise us otherwise!)
                timeout: 1000 * 60,     // default: 60000 (1 minute)
                // (optional) function invoked whenever this fanciness handles
                // any ratelimiting error.
                // this is useful for debugging and analysing your bot
                // behavior
                notify(methodName, ...args) {   // default: undefined
                    // 'methodName' is the name of the invoked method
                    // 'args' is an array of the arguments passed to the method
                    // do something useful here
                    // ...snip...
                },
                // maximum number of milliseconds to allow for waiting
                // in backoff-mode before retrying the request.
                // This is important to avoid situations where the server
                // can cause lengthy timeouts e.g. too long of a wait-time
                // that is causes adverse effects on efficiency and performance.
                maxBackoff: 1000 * 60 * 5,      // default: 5 minutes
            },
        },
    });

    Fancied functions: [ "addStickerToSet", "answerCallbackQuery", "answerInlineQuery", "answerPreCheckoutQuery", "answerShippingQuery", "createNewStickerSet", "deleteChatPhoto", "deleteChatStickerSet", "deleteMessage", "deleteStickerFromSet", "downloadFile", "editMessageCaption", "editMessageLiveLocation", "editMessageReplyMarkup", "editMessageText", "exportChatInviteLink", "forwardMessage", "getChat", "getChatAdministrators", "getChatMember", "getChatMembersCount", "getFile", "getFileLink", "getGameHighScores", "getStickerSet", "getUpdates", "getUserProfilePhotos", "kickChatMember", "leaveChat", "pinChatMessage", "promoteChatMember", "restrictChatMember", "sendAudio", "sendChatAction", "sendContact", "sendDocument", "sendGame", "sendInvoice", "sendLocation", "sendMediaGroup", "sendMessage", "sendPhoto", "sendSticker", "sendVenue", "sendVideo", "sendVideoNote", "sendVoice", "setChatDescription", "setChatPhoto", "setChatStickerSet", "setChatTitle", "setGameScore", "setStickerPositionInSet", "setWebHook", "stopMessageLiveLocation", "unbanChatMember", "unpinChatMessage", "uploadStickerFile", ]

    An earlier discussion on this feature can be found here. See example at example/ratelimited.js.


    Emojification:

    Any Github-flavoured Markdown emoji, such as :heart: can be replaced automatically with their corresponding Unicode values. By default, uses the node-emoji library (Go give a star!). Disabled by default.

    Feature option: emojification (see above)

    For example,

    const bot = new Tgfancy(token, {
        tgfancy: {
            emojification: true,
        },
    });
    bot.sendMessage(chatId, "Message text with :heart: emoji")
        .then(function(msg) {
            // 'msg' is the Message sent to the chat
            console.log(msg.text); // => "Message text with ❤️ emoji"
        });

    However, it is possible to define a custom function used to perform emojification. The function must have the signature, emojify(text) and return the emojified text.

    const bot = new Tgfancy(token, {
        tgfancy: {
            emojification: {
                emojify(text) {
                    // emojify here
                    // ... snip ...
                    return emojifiedText;
                },
            },
        },
    });

    Fancied functions: ["sendMessage", "editMessageText"]

    See example at example/emojified.js.


    Fetching Updates via WebSocket:

    In addition to polling and web-hooks, this introduces another mechanism for fetching your updates: WebSocket. While currently it is not officially supported by Telegram, we have a bridge up and running that you can connect to for this purpose. Disabled by default.

    Feature option: webSocket (see above)

    For example,

    const bot = new Tgfancy(token, {
        tgfancy: {
            webSocket: true,
        },
    });

    The current default bridge is at wss://telegram-websocket-bridge-qalwkrjzzs.now.sh and is being run by @GingerPlusPlus.

    You can specify more options as so:

    const bot = new Tgfancy(token, {
        tgfancy: {
            webSocket: {
                // specify a custom URL for a different bridge
                url: "wss://telegram-websocket-bridge-qalwkrjzzs.now.sh",
                // immediately open the websocket
                autoOpen: true,
            },
        },
    });

    See example at example/web-socket.js.


    license:

    The MIT License (MIT)

    Copyright (c) 2016 GochoMugo mugo@forfuture.co.ke

    Visit original content creator repository https://github.com/GochoMugo/tgfancy
  • Discord.js-bot-template

    Discord.js Discord bot template

    Basic bot template with command handler and event handler.

    This is being updated to discord.js v14 and to use slash commands

    This README is gonna be rewritten later

    Change Token and prefix in config.json

    Make commands in commands folder.

    There is ping command in commands folder
    the default prefix of the bot is ! you can change this in the config.json

    Prerequisites

    What things you need to install the software and how to install them:

    Node.js
    

    Installing:

    A step by step series of how to get the bot running

    Install Node.js:

    1. Goto downloads
    2. You can choose the lts or the current version of node.js depending on what you want
      then download the installer according to your operating system

    Node.js

    Installing discord.js and making the bot folder

    After you have node.js:

    1. Create a folder on your computer.
    2. On windows open cmd and copy the folder location from top of the file browser.
    3. On cmd type cd “then paste the location” and enter
    4. Do in the cmd npm i discord.js to install discord.js
      Before you do the install command make sure the cmd window is in the right folder
      what is the api used to connect to Discord.
    Getting this bot and starting it:

    1. Download this project as a zip file then move the zip file to the folder you created
    2. Unzip it there then put token in the config.json to get a token goto Discord Developer Site link below
    3. After you have token in config.json and have installed discord.js you can start bot by typing node app.js

    Discord Developer Site

    Other things you can do for bot develoment

    You can install nodemon to restart the bot everytime the bot file is changed
    to install nodemon globally type `npm i -g nodemon`
    

    Authors

    Built With

    • Node.js – the base that the bot runs on
    • discord.js – node.js link to the discord bot api

    Visit original content creator repository
    https://github.com/CappeDiem/Discord.js-bot-template

  • rails_full_page_cache

    Full Page Cache on Rails

    A sample project to use full page caching on Rails (using actionpack-page_caching).

    Main points:

    • app/controllers/application_controller.rb: /update (js) route to send CSRF token, flash messages and optionally DOM elements to modify
    • app/controllers/posts_controller.rb: caches_page actions, json only responses for create, update and destroy
    • app/models/application_record.rb: update cache methods
    • app/models/post.rb: cache callbacks, cache dependecies
    • app/views/layouts/application.html.erb: on DOM ready an update AJAX call is made, data-remote AJAX callbacks (for forms)
    • app/views/posts/_form.html.erb: form with remote option
    • config/environments/development.rb: caching enabled, js compression, don’t serve static files
    • config/initializers/actionpack-page_caching.rb: cache directory, caching compression
    • lib/tasks/cache.rake: cache routes, cache tasks: generate_all, generate

    Extra notes:

    • In the branch experiments I’m trying to improve some points, for example: removing the update AJAX call on DOM ready, calling it only before a form submit
    • In the update route the CSRF token is available to anyone, this could be a security risk (in this sample project it’s used only for testing); an alternative could be to disable CSRF protection for cached routes using a good reCAPTCHA instead, another option is to disable caching for routes with forms

    Project setup

    rails g model Author name:string age:integer email:string
    rails g model Post title:string description:text author:belongs_to category:string dt:datetime position:float published:boolean
    rails g model Detail description:text author:belongs_to
    rails g model Tag name:string
    rails g model PostTag post:belongs_to tag:belongs_to

    Serve static assets

    rails assets:clean assets:precompile
    rails cache:generate_all
    rails server -b 0.0.0.0

    nginx sample conf

    worker_processes  1;
    
    events {
        worker_connections  1024;
    }
    
    http {
        include       mime.types;
        default_type  application/octet-stream;
    
        sendfile        on;
    
        keepalive_timeout  65;
    
        gzip  on;
        gzip_min_length 1024;
        gzip_types application/json application/javascript application/x-javascript application/xml application/xml+rss text/plain text/css text/xml text/javascript;
    
        server {
            server_name  localhost;
    
            listen       8080;
            # listen       80;
            # listen       443 ssl http2;
    
            # ssl_certificate /usr/local/etc/nginx/ssl/server.pem;
            # ssl_certificate_key /usr/local/etc/nginx/ssl/server.key;
    
            large_client_header_buffers 4 16k;
    
            rewrite ^/(.*)/$ /$1 permanent;
    
            location / {
                error_page 418 = @app;
                recursive_error_pages on;
    
                if ($request_method != GET) {
                    return 418;
                    # proxy_pass http://0.0.0.0:3000;
                }
    
                root /projects/rails_full_page_cache/public;
                index index.html index.htm;
                gzip_static on;
    
                # try_files /out/$uri/index.html /out/$uri.html /out/$uri/ /out/$uri $uri $uri/ @app;
                try_files /cache/$uri.html $uri @app;
    
                # try_files /out/$uri/index.html /out/$uri /out/$uri/ $uri $uri/ @app;
            }
    
            location @app {
                proxy_pass http://0.0.0.0:3000;
                proxy_set_header  Host $host;
                proxy_set_header  X-Forwarded-For $proxy_add_x_forwarded_for;
                proxy_set_header  X-Forwarded-Proto $scheme;
                proxy_set_header  X-Forwarded-Ssl on; # Optional
                proxy_set_header  X-Forwarded-Port $server_port;
                proxy_set_header  X-Forwarded-Host $host;
            }
    
            # redirect server error pages to the static page /50x.html
            #
            error_page   500 502 503 504  /50x.html;
            location = /50x.html {
                root   html;
            }
        }
    
        include servers/*;
    }
    

    Visit original content creator repository
    https://github.com/blocknotes/rails_full_page_cache

  • Tight-Inclusion

    Tight-Inclusion Continuous Collision Detection

    Build

    A conservative continuous collision detection (CCD) method with support for minimum separation.

    To know more about this work, please read our ACM Transactions on Graphics paper:
    “A Large Scale Benchmark and an Inclusion-Based Algorithm for Continuous Collision Detection” and watch our SIGGRAPH 2022 presentation.

    Build

    To compile the code, first, make sure CMake is installed.

    To build the library on Linux or macOS:

    mkdir build
    cd build
    cmake .. -DCMAKE_BUILD_TYPE=Release
    make -j4

    Then you can run a CCD example:

    ./app/Tight_Inclusion_bin

    Optional

    We also provide an example that tests sample queries using our CCD method. This requires installing gmp on your system before compiling the code. Set the CMake option TIGHT_INCLUSION_WITH_SAMPLE_QUERIES to ON when compiling:

    cmake .. -DCMAKE_BUILD_TYPE=Release -DTIGHT_INCLUSION_WITH_SAMPLE_QUERIES=ON
    make -j4

    Then you can run ./app/Tight_Inclusion_bin to test the handcrafted and simulation queries in the Sample Queries.

    Usage

    Overview

    • Include: #include <tight_inclusion/ccd.hpp>
    • Check vertex-face CCD: bool ticcd::vertexFaceCCD(...)
    • Check edge-edge CCD: bool ticcd::edgeEdgeCCD(...)

    Details

    💡 Each CCD function returns a boolean result corresponding to if a collision is detected. Because our method is conservative, we guarantee a result of false implies no collision occurs. If the result is true, there may not be a collision but we falsely report a collision. However, we can guarantee that this happens only if the minimal distance between the two primitives in this time step is no larger than tolerance + ms + err (see below for a description of these parameters).

    Parameters

    For both vertex-face and edge-edge CCD, the input query is given by eight vertices which are in the format of Eigen::Vector3d. Please read our code in tight_inclusion/ccd.hpp for the correct input order of the vertices.

    Besides the input vertices, there are some input and output parameters for users to tune the performance or to get more information from the CCD.

    Here is a list of the explanations of the parameters:

    Input
    • err: The numerical filters of the $x$, $y$ and $z$ coordinates. It measures the errors introduced by floating-point calculation when solving inclusion functions.
    • ms: A minimum separation distance (no less than 0). We guarantee a collision will be reported if the distance between the two primitives is less than ms.
    • tolerance: User-specific solving precision. It is the target maximal $x$, $y$, and $z$ length of the inclusion function. We suggest the to use 1e-6.
    • t_max: The time range $[0, t_{\max}]$ where we detect collisions. Since the input query implies the motion is in time interval $[0, 1]$, t_max should not be larger than 1.
    • max_itr: The maximum number of iterations our inclusion-based root-finding algorithm can take. This enables early termination of the algorithm. If you set max_itr < 0, early termination will be disabled, but this may cause longer running times. We suggest setting max_itr = 1e6.
    • no_zero_toi: For simulators which use non-zero minimum separation distance (ms > 0) to make sure intersection-free for each time-step, we have the option no_zero_toi to avoid returning a collision time toi of 0. The code will continue the refinement in higher precision if the output toi is 0 under the given tolerance, so the eventual toi will not be 0.
    • CCD_TYPE: Enumeration of possible CCD schemes. The default and recommended type is BREADTH_FIRST_SEARCH. If set DEPTH_FIRST_SEARCH, the code will switch to a naive conservative CCD algorithm but lacks our advanced features.
    Output
    • toi: The time of impact. If multiple collisions happen in this time step, it will return the earliest collision time. If there is no collision, the returned toi value will be std::numeric_limits<double>::infinity().
    • output_tolerance: The resulting solve’s precision. If early termination is enabled, the solving precision may not reach the target precision. This parameter will return the resulting solving precision when the code is terminated.

    Tips

    💡 The input parameter err is crucial to guarantee our algorithm is a conservative method not affected by floating-point rounding errors. To run a single query, you can set err = Eigen::Array3d(-1, -1, -1) to enable a sub-function to calculate the real numerical filters when solving CCD. If you are integrating our CCD in simulators, you need to:

    • Include the headler: #include <tight_inclusion/interval_root_finder.hpp>.
    • Call
      std::array<double, 3> err_vf = ticcd::get_numerical_error()
      
      and
      std::array<double, 3> err_ee = ticcd::get_numerical_error()
      
    • Use the parameter err_ee each time you call bool ticcd::edgeEdgeCCD() and err_vf when you call bool ticcd::vertexFaceCCD().

    The parameters for function ticcd::get_numerical_error() are:

    • vertices: Vertices of the axis-aligned bounding box of the simulation scene. Before you run the simulation, you need to conservatively estimate the axis-aligned bounding box in which the meshes will be located during the whole simulation process, and the vertices should be the corners of the AABB.
    • is_vertex_face: A boolean flag corresponding to if you are checking vertex-face or edge-edge CCD.
    • using_minimum_separation: A boolean flag corresponding to if you are using minimum-separation CCD (the input parameter ms > 0).

    To better understand or to get more details of our Tight-Inclusion CCD algorithm, please refer to our paper.

    Citation

    If you use this work in your project, please consider citing the original paper:

    @article{Wang:2021:Benchmark,
        title        = {A Large Scale Benchmark and an Inclusion-Based Algorithm for Continuous Collision Detection},
        author       = {Bolun Wang and Zachary Ferguson and Teseo Schneider and Xin Jiang and Marco Attene and Daniele Panozzo},
        year         = 2021,
        month        = oct,
        journal      = {ACM Transactions on Graphics},
        volume       = 40,
        number       = 5,
        articleno    = 188,
        numpages     = 16
    }
    Visit original content creator repository https://github.com/Continuous-Collision-Detection/Tight-Inclusion
  • MarkovJuniorWeb

    Typescript version of MarkovJunior, runs in browser (also in node.js).

    • Everything have been implemented including isometric rendering, exporting the output as a .vox file, and node tree visualization.
    • Every model from the original repository can be loaded with this project, but the output would be different due to different random seed implementation (dotnet builtin vs seededrandom).

    demo RTX=on

    Development

    • Install dependensies: npm i
    • Start development server on localhost: npm start
    • Build static site: npm build
    • Run in node (writes result to /output): npm run cli

    Random Notes

    • I want to implement markovjunior in UE 5.2 as a plugin to the PCG component. MarkovJunior can be integrated as a special typed subgraph. UE 5.2 PCG is very data oriented – everything in a table where row is element and column is attributes. MarkovJunior output 2D/3D grid can be flattened to this table where row is pixel/voxel and column is the value. The result can be quite powerful, static mesh actors can be placed correspond to the output, graphs can be nested so the final output can be very detailed and hierarchical, and grid patterns can be broken as well by varying transforms to the gragh or generated actors. The only downside is this would take a lot of time and UE 5.2 is still in preview.

    • This port is around 2x slower than the original repo (JS vs C#), but it doesn’t affect the page much; even with 200 steps per frame there’s hardly any FPS drop on most models. However, the slowdown is quite noticable on computation expensive calculations, e.g. uni/bi-direction inference.

    • SokobanLevel1 takes ~10 seconds for the original C# code on my pc to reach the desired state, while it takes 20+ seconds on the web. I’ve tried JIT/unroll the rules into webassembly with generated AssemblyScript and it actually works: it gains a x2 speedup and the performance almost match the native C# version. The only problem is the load & compile time is terrilbe and it’s incredibly hard to debug WebAssembly. I rolled back the commits on main and put the experimental stuff in the optimization branch, but I’m still pretty proud of this MarkovJunior rules -> AssemblyScript -> Wasm “JIT” compiler I wrote.

    • Update: I wrote a precompiled wasm version and it works fine, and the runtime is reduced from 20+ seconds on SokobanLevel1 to ~13 seconds (not too bad I guess ¯\_(ツ)_/¯ ).

    Visit original content creator repository https://github.com/Yuu6883/MarkovJuniorWeb
  • acEFM

    acEFM

    This permits the use of JSBSim models from with DCS World; There must be a config file in the root of your mod; “aceFMconfig.xml” that sets the basic data (properties) and defines which JSBSim XML file to use. Usually the JSBSim XML will include other files (e.g. engines, systems).

    acEFMconfig.xml DCS elements

    Cockpit API

    acEFM supports the mapping between properties and the cockpit API (pfn_ed_cockpit_update_parameter_with_number(Handle, val);

    Nodes as follows

    • <param> node defines the Handle to lookup
    • <property> where the value comes from
    • <factor> optional fixed factor to apply
    • <delta> the amount the property must change before an update is trigged (optional, default 0.0001)
    • <type> defines the type of the node which defines how the property value is handled prior to setting the value on the handle. Currently supported is the default type (nothing special) or GenevaDrive which will animation a Geneva Drive for instrument drums. LinearDrive is a linear drive. Only the default type is currently fully implemented.
        <cockpit>
          <gauge>
            <param>Airspeed</param>
            <property>/fdm/jsbsim/velocities/vc-kts</property>
          </gauge>
          
          <gauge>
            <param>FuelFlow_Right</param>
            <property>/fdm/jsbsim/propulsion/engine[1]/fuel-flow-rate-pps</property>
            <factor>3600</factor>
          </gauge>
          ...
        </cockpit>
    

    Animations

    The config file can contain an <animation> node that permits the mapping of draw arguments

    Draw arguments

    You can define which properties are mapped to the draw arguments for your model. These will be set inside ed_fm_set_draw_args

    Nodes as follows

    • <param> node defines the Handle to lookup
    • <property> where the value comes from
    • <factor> optional fixed factor to apply
    • <delta> the amount the property must change before an update is trigged (optional, default 0.0001)

    e.g. for afterburners.

        <animations>
          <drawarg n="28">
            <property>fdm/jsbsim/propulsion/engine[0]/augmentation-alight-norm</property>
            <delta>0.01</delta>
          </drawarg>
          <drawarg n="29">
            <property>fdm/jsbsim/propulsion/engine[1]/augmentation-alight-norm</property>
            <delta>0.01</delta>
          </drawarg>
        </animations>
    

    Folder structure

    The main config files is c:\users\YOU\Saved Games\DCS.openbeta\Mods\Aircraft\YOURMODEL\aceFMconfig.xml. This defines all of the basic properties that the JSBSim XML requires and is where you can define what the draw arguments and cockpit animations.

    JSBSim XML files

    • EFM/YOURMODEL.xml
    • EFM/engines/
    • EFM/systems/

    e.g.

    • efm\Engines
    • efm\Systems
    • efm\YOURMODEL-main-jsb.xml
    • efm\Engines\direct.xml
    • efm\Engines\YOURENGINE.xml
    • efm\Systems\YOURFCS.xml
    • efm\Systems\other-system.xml

    SYMON

    Symon permits the inspection and modifications of all properties at run time. Your EFM\jsbsim-model.xml must have the following

     <input port="1137"/>
    

    Symon must be connected after DCS has loaded your model (and the debug window has appeared). Once connected you should use the “reload” button to populate the list of properties. Once populated you can double click a property on the left window to include it on the right.

    Symon GUI image.

    Visit original content creator repository https://github.com/Zaretto/acEFM
  • typescript-data-types

    🌠 Optional, Either and Result in Typescript 🌠

    Implementation of useful data types in typescript that are available in other languages.

    💡 Current data types

    A complete suite of test covering the different methods is provided. Multiple operations are attached for each one of the data types. It is recommended to give an overview to the documentation of the implemented operations. Following, a small description an example of usage of each one of the available types.

    Optional:

    Java-like optional with extra operations. Encapsulates the idea of having or not a value. Similar to Maybe data type.

        const user = userRepository.get(userId)
                  .map(user => user.getId())
                  .orElseThrow(() => new UserNotFoundError());
    

    Either:

    Encapsulates the possibility of having only one of two values of different types, a left type and a right type. Usually right type is associated to a ‘correct’ value, while the left value is more associated to errors.

        const value = Either.right<boolean, number>(0)
                  .bimap(value => +value, value => value + 1)
                  .get();
    

    Result:

    Encapsulates the possibility of having an error result or a valid result. Similar to Either, but enfocing the idea of an error result being an error.

        const value = Result.ok(3).get();


    status

    Visit original content creator repository https://github.com/alepariciog/typescript-data-types
  • wdio-qunit-service

    wdio-qunit-service

    npm test

    WebdriverIO (wdio) service for running QUnit browser-based tests and dynamically converting them to wdio test suites.

    Replacing Karma

    QUnit Service is a drop-in replacement for those using Karma JS to run their QUnit tests (karma-qunit, karma-ui5 or any other combination of Karma and QUnit). Karma is deprecated and people should move to modern alternatives!

    If you want to keep your QUnit tests as they are, with no rewriting and no refactoring, QUnit Service is everything you need. It runs your QUnit HTML files in a browser and captures all the results in wdio format.

    Because of that, developers can use QUnit Service in tandem with everything else available in the wdio ecosystem.

    Want to record the test run in a video? Perhaps take a screenshot or save it in PDF? Check the Code coverage? Save the test results in JUnit format? Go for it, QUnit Service doesn’t get on your way.

    Installation

    After configuring WebdriverIO, install wdio-qunit-service as a devDependency in your package.json file.

    npm install wdio-qunit-service --save-dev

    If you haven’t configured WebdriverIO yet, check the official documentation out.

    Configuration

    In order to use QUnit Service you just need to add it to the services list in your wdio.conf.js file. The wdio documentation has all information related to the configuration file:

    // wdio.conf.js
    export const config = {
      // ...
      services: ["qunit"],
      // ...
    };

    Usage

    Make sure the web server is up and running before executing the tests. wdio will not start the web server.

    With .spec or .test files

    In your WebdriverIO test, you need to navigate to the QUnit HTML test page, then call browser.getQUnitResults().

    describe("QUnit test page", () => {
      it("should pass QUnit tests", async () => {
        await browser.url("http://localhost:8080/test/unit/unitTests.qunit.html");
        await browser.getQUnitResults();
      });
    });

    It’s recommended to have one WebdriverIO test file per QUnit HTML test page. This ensures the tests will run in parallel and fully isolated.

    Configuration only, no .spec or .test files

    If you don’t want to create spec/test files, you can pass a list of QUnit HTML files to the configuration and the tests will be automatically generated.

    // wdio.conf.js
    export const config = {
      // ...
      baseUrl: 'http://localhost:8080',
      services: [
        ['qunit', {
          paths: [
            'unit-tests.html',
            'integration-tests.html',
            'test/qunit.html'
          ]
        }],
      // ...
    };

    Test results

    Test results could look like: QUnit Service test results

    Examples

    Check the examples folder out for samples using javascript, typescript and more.

    Usage in SAP Fiori / UI5 apps

    Straight forward example using the well known openui5-sample-app:

    • Create a configuration file: wdio.conf.js

    • Tell wdio where to find the QUnit test files:

      • or
    • The web server must be running before executing the tests

    • Run it $ wdio run webapp/test/wdio.conf.js

    Author

    Mauricio Lauffer

    License

    This project is licensed under the MIT License – see the LICENSE file for details.

    Visit original content creator repository https://github.com/mauriciolauffer/wdio-qunit-service