Category: Blog

  • acEFM

    acEFM

    This permits the use of JSBSim models from with DCS World; There must be a config file in the root of your mod; “aceFMconfig.xml” that sets the basic data (properties) and defines which JSBSim XML file to use. Usually the JSBSim XML will include other files (e.g. engines, systems).

    acEFMconfig.xml DCS elements

    Cockpit API

    acEFM supports the mapping between properties and the cockpit API (pfn_ed_cockpit_update_parameter_with_number(Handle, val);

    Nodes as follows

    • <param> node defines the Handle to lookup
    • <property> where the value comes from
    • <factor> optional fixed factor to apply
    • <delta> the amount the property must change before an update is trigged (optional, default 0.0001)
    • <type> defines the type of the node which defines how the property value is handled prior to setting the value on the handle. Currently supported is the default type (nothing special) or GenevaDrive which will animation a Geneva Drive for instrument drums. LinearDrive is a linear drive. Only the default type is currently fully implemented.
        <cockpit>
          <gauge>
            <param>Airspeed</param>
            <property>/fdm/jsbsim/velocities/vc-kts</property>
          </gauge>
          
          <gauge>
            <param>FuelFlow_Right</param>
            <property>/fdm/jsbsim/propulsion/engine[1]/fuel-flow-rate-pps</property>
            <factor>3600</factor>
          </gauge>
          ...
        </cockpit>
    

    Animations

    The config file can contain an <animation> node that permits the mapping of draw arguments

    Draw arguments

    You can define which properties are mapped to the draw arguments for your model. These will be set inside ed_fm_set_draw_args

    Nodes as follows

    • <param> node defines the Handle to lookup
    • <property> where the value comes from
    • <factor> optional fixed factor to apply
    • <delta> the amount the property must change before an update is trigged (optional, default 0.0001)

    e.g. for afterburners.

        <animations>
          <drawarg n="28">
            <property>fdm/jsbsim/propulsion/engine[0]/augmentation-alight-norm</property>
            <delta>0.01</delta>
          </drawarg>
          <drawarg n="29">
            <property>fdm/jsbsim/propulsion/engine[1]/augmentation-alight-norm</property>
            <delta>0.01</delta>
          </drawarg>
        </animations>
    

    Folder structure

    The main config files is c:\users\YOU\Saved Games\DCS.openbeta\Mods\Aircraft\YOURMODEL\aceFMconfig.xml. This defines all of the basic properties that the JSBSim XML requires and is where you can define what the draw arguments and cockpit animations.

    JSBSim XML files

    • EFM/YOURMODEL.xml
    • EFM/engines/
    • EFM/systems/

    e.g.

    • efm\Engines
    • efm\Systems
    • efm\YOURMODEL-main-jsb.xml
    • efm\Engines\direct.xml
    • efm\Engines\YOURENGINE.xml
    • efm\Systems\YOURFCS.xml
    • efm\Systems\other-system.xml

    SYMON

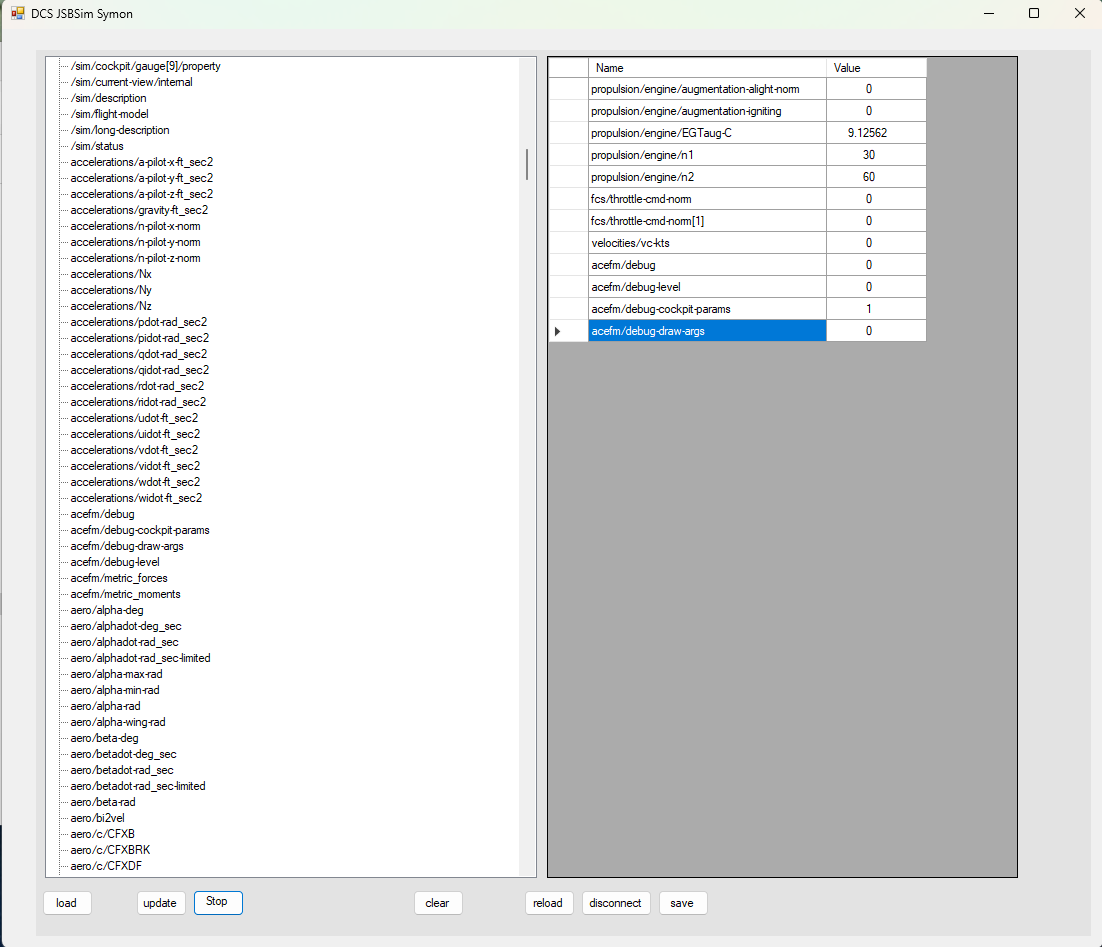
    Symon permits the inspection and modifications of all properties at run time. Your EFM\jsbsim-model.xml must have the following

     <input port="1137"/>
    

    Symon must be connected after DCS has loaded your model (and the debug window has appeared). Once connected you should use the “reload” button to populate the list of properties. Once populated you can double click a property on the left window to include it on the right.

    Symon GUI image.

    Visit original content creator repository https://github.com/Zaretto/acEFM
  • typescript-data-types

    🌠 Optional, Either and Result in Typescript 🌠

    Implementation of useful data types in typescript that are available in other languages.

    💡 Current data types

    A complete suite of test covering the different methods is provided. Multiple operations are attached for each one of the data types. It is recommended to give an overview to the documentation of the implemented operations. Following, a small description an example of usage of each one of the available types.

    Optional:

    Java-like optional with extra operations. Encapsulates the idea of having or not a value. Similar to Maybe data type.

        const user = userRepository.get(userId)
                  .map(user => user.getId())
                  .orElseThrow(() => new UserNotFoundError());
    

    Either:

    Encapsulates the possibility of having only one of two values of different types, a left type and a right type. Usually right type is associated to a ‘correct’ value, while the left value is more associated to errors.

        const value = Either.right<boolean, number>(0)
                  .bimap(value => +value, value => value + 1)
                  .get();
    

    Result:

    Encapsulates the possibility of having an error result or a valid result. Similar to Either, but enfocing the idea of an error result being an error.

        const value = Result.ok(3).get();


    status

    Visit original content creator repository https://github.com/alepariciog/typescript-data-types
  • wdio-qunit-service

    wdio-qunit-service

    npm test

    WebdriverIO (wdio) service for running QUnit browser-based tests and dynamically converting them to wdio test suites.

    Replacing Karma

    QUnit Service is a drop-in replacement for those using Karma JS to run their QUnit tests (karma-qunit, karma-ui5 or any other combination of Karma and QUnit). Karma is deprecated and people should move to modern alternatives!

    If you want to keep your QUnit tests as they are, with no rewriting and no refactoring, QUnit Service is everything you need. It runs your QUnit HTML files in a browser and captures all the results in wdio format.

    Because of that, developers can use QUnit Service in tandem with everything else available in the wdio ecosystem.

    Want to record the test run in a video? Perhaps take a screenshot or save it in PDF? Check the Code coverage? Save the test results in JUnit format? Go for it, QUnit Service doesn’t get on your way.

    Installation

    After configuring WebdriverIO, install wdio-qunit-service as a devDependency in your package.json file.

    npm install wdio-qunit-service --save-dev

    If you haven’t configured WebdriverIO yet, check the official documentation out.

    Configuration

    In order to use QUnit Service you just need to add it to the services list in your wdio.conf.js file. The wdio documentation has all information related to the configuration file:

    // wdio.conf.js
    export const config = {
      // ...
      services: ["qunit"],
      // ...
    };

    Usage

    Make sure the web server is up and running before executing the tests. wdio will not start the web server.

    With .spec or .test files

    In your WebdriverIO test, you need to navigate to the QUnit HTML test page, then call browser.getQUnitResults().

    describe("QUnit test page", () => {
      it("should pass QUnit tests", async () => {
        await browser.url("http://localhost:8080/test/unit/unitTests.qunit.html");
        await browser.getQUnitResults();
      });
    });

    It’s recommended to have one WebdriverIO test file per QUnit HTML test page. This ensures the tests will run in parallel and fully isolated.

    Configuration only, no .spec or .test files

    If you don’t want to create spec/test files, you can pass a list of QUnit HTML files to the configuration and the tests will be automatically generated.

    // wdio.conf.js
    export const config = {
      // ...
      baseUrl: 'http://localhost:8080',
      services: [
        ['qunit', {
          paths: [
            'unit-tests.html',
            'integration-tests.html',
            'test/qunit.html'
          ]
        }],
      // ...
    };

    Test results

    Test results could look like: QUnit Service test results

    Examples

    Check the examples folder out for samples using javascript, typescript and more.

    Usage in SAP Fiori / UI5 apps

    Straight forward example using the well known openui5-sample-app:

    • Create a configuration file: wdio.conf.js

    • Tell wdio where to find the QUnit test files:

      • or
    • The web server must be running before executing the tests

    • Run it $ wdio run webapp/test/wdio.conf.js

    Author

    Mauricio Lauffer

    License

    This project is licensed under the MIT License – see the LICENSE file for details.

    Visit original content creator repository https://github.com/mauriciolauffer/wdio-qunit-service
  • solid-api

    Discord logo

    SOLID principles in a REST API with Node.js and TypeScript

    GitHub top language GitHub language count GitHub last commit GitHub issues GitHub

    About The Project   |    Technologies   |    Getting Started   |    How To Contribute   |    License

    👨🏻‍💻 About the project

    Insomnia

    Mailtrap

    SOLID Principles is a coding standard that all developers should have a clear concept for developing software properly to avoid a bad design. It was promoted by Robert C Martin and is used across the object-oriented design spectrum. When applied properly it makes your code more extendable, logical, and easier to read.

    So, I decided to study and I created a simple SOLID API with Node.js and TypeScript.

    This project consists of sending welcome emails after creating a registration in the application via Insomnia.

    🚀 Technologies

    Main technologies that I used to develop this frontend app

    💻 Getting started

    Requirements

    Clone the project and access the folder

    $ git clone https://github.com/eltonlazzarin/solid-api.git
    
    $ cd solid-api

    Follow the steps below

    # Install the dependencies
    $ yarn i
    
    # Run the web app
    $ yarn start

    🤔 How to contribute

    Follow the steps below

    # Clone your fork
    $ git clone https://github.com/eltonlazzarin/solid-api.git
    
    $ cd solid-api
    
    # Create a branch with your feature
    $ git checkout -b your-feature
    
    # Make the commit with your changes
    $ git commit -m 'feat: Your new feature'
    
    # Send the code to your remote branch
    $ git push origin your-feature

    After your pull request is merged, you can delete your branch

    📝 License

    This project is under the MIT license. See the LICENSE for more information.

    Visit original content creator repository https://github.com/eltonlazzarin/solid-api
  • cdc-pubsub

    CockroachDB CDC to Google Pub/Sub Bridge

    CockroachDB as of v22.1 natively supports sending a changefeed to Google Pub/Sub. This repository is now archived, but will be retained for demonstration purposes.

    This application demonstrates an approach to connecting a CockroachDB
    Enterprise Change Data
    Capture

    (CDC) feed into Google’s
    Pub/Sub
    service,
    until such time as CockroachDB
    natively supports
    Google Pub/Sub in a future release.

    This uses the experimental HTTP(S) backend to deliver JSON-formatted
    payloads to a topic.

    Getting Started

    • Create a GCP service account and download its JSON credentials file.
    • Grant the service account Pub/Sub Editor to automatically create a
      topic, or Pub/Sub Publisher if you wish to manually create the topic.
    • Move the JSON credentials file into a working directory $HOME/cdc-pubsub/cdc-pubsub.json
    • Start the bridge server:
      • docker run --rm -it -v $HOME/cdc-pubsub:/data:ro -p 13013:13013 bobvawter/cdc-pubsub:latest --projectID my-project-id --sharedKey xyzzy
    • Create an enterprise changefeed in CockroachDB:
      • SET CLUSTER STETING kv.rangefeed.enabled = true; if you haven’t previously enabled rangefeeds for your cluster.
      • CREATE CHANGEFEED FOR TABLE foo INTO 'experimental-http://127.0.0.1:13013/v1/my-topic?sharedKey=xyzzy' WITH updated;
      • Replace my-topic with your preferred topic name.
    • Check the log for progress.

    Flags

          --bindAddr string        the address to bind to (default ":13013")
          --credentials string     a JSON-formatted Google Cloud credentials file (default
                                   "cdc-pubsub.json")
          --dumpOnly               if true, log payloads instead of sending to pub/sub
          --gracePeriod duration   shutdown grace period (default 30s)
      -h, --help                   display this message
          --projectID string       the Google Cloud project ID
          --sharedKey strings      require clients to provide one of these secret values
          --topicPrefix string     a prefix to add to topic names
    

    Pub/Sub Attributes

    Each Pub/Sub message will be labelled with the following attributes.

    • table: The affected SQL table.
    • path: The complete path used to post the message.

    Building

    docker build . -t cdc-pubsub

    Other endpoints

    If the bridge is to be placed behind a load-balancer (e.g. in a
    Kubernetes environment), there is a /healthz endpoint which always
    returns OK.

    Runtime profiling information is available at /debug/pprof

    Security implications

    The bridge server provides the option of shared key which is provided by
    the CDC feed via the sharedKey query parameter. This key prevents
    users from inadvertently “crossing the streams” as opposed to being a
    proper security mechanism:

    • Any HTTP client with this shared key can effectively post arbitrary
      messages to any Pub/Sub topic that the bridge’s service account has
      access to.
    • Any SQL user that can execute the SHOW JOBS command can view the shared key.
    • Any user that can view the Jobs page in the Admin UI can view the shared key.
    • The shared key will likely appear unobfuscated in CockroachDB logs.

    Seamless rotation of shared keys is possible by passing multiple
    --sharedKey arguments to the bridge server.

    Google Cloud IAM restrictions can be added to the role account to limit
    the names of the Pub/Sub topics that it may access.

    Deployment strategy

    Given the lightweight nature of the bridge server and the above security
    limitations, users should deploy this server as a “sidecar” alongside
    each of their CockroachDB nodes, bound only to a loopback IP address via
    the --bindAddr flag.

    If the bridge is to be deployed as a traditional network service, it
    should be placed behind a TLS loadbalancer with appropriate firewall
    rules.

    Visit original content creator repository
    https://github.com/bobvawter/cdc-pubsub

  • Decentralized-Voting-System-Using-Ethereum-Blockchain

    Decentralized-Voting-System-Using-Ethereum-Blockchain

    The Decentralized Voting System using Ethereum Blockchain is a secure and transparent solution for conducting elections. Leveraging Ethereum’s blockchain technology, this system ensures tamper-proof voting records, enabling users to cast their votes remotely while maintaining anonymity and preventing fraud.


    Table of Contents


    Features

    • JWT for secure voter authentication and authorization.
    • Ethereum blockchain for tamper-proof and transparent voting records.
    • Removes the need for intermediaries, ensuring a trustless voting process.
    • Admin panel to manage candidates, set voting dates, and monitor results.
    • Intuitive UI for voters to cast votes and view candidate information.

    Screenshots

    Admin Page

    Admin Page

    Voting Page

    Voting Page

    Login Page

    Login Page


    Requirements

    • Node.js (version 18.14.0)
    • Metamask
    • Python (version 3.9)
    • FastAPI
    • MySQL Database (port 3306)

    Installation

    1. Clone the repository:

      git clone https://github.com/akanksha509/Decentralized-Voting-System-Using-Ethereum-Blockchain.git
    2. Download and install Ganache.

    3. Create a workspace named development in Ganache, then add truffle-config.js in the Truffle projects section by clicking ADD PROJECT.

    4. Install Metamask in your browser and import the Ganache accounts into Metamask.

    5. Add a network to Metamask:

    6. Create a MySQL database named voter_db (avoid using XAMPP). Inside this database, create a table voters:

      CREATE TABLE voters (
          voter_id VARCHAR(36) PRIMARY KEY NOT NULL,
          role ENUM('admin', 'user') NOT NULL,
          password VARCHAR(255) NOT NULL
      );
    7. Install Truffle globally:

      npm install -g truffle
    8. Install Node.js dependencies (in the project folder):

      npm install
    9. Install Python dependencies:

      pip install fastapi mysql-connector-python pydantic python-dotenv uvicorn uvicorn[standard] PyJWT

    Usage

    Note: Update the database credentials in ./Database_API/.env with your MySQL username, password, etc.

    1. Open Ganache and select the development workspace.

    2. Open a terminal in the project directory and enter the Truffle console:

      truffle console
    3. Compile the smart contracts:

      compile

      Then exit the console by typing .exit or pressing Ctrl + C.

    4. Bundle app.js with Browserify:

      browserify ./src/js/app.js -o ./src/dist/app.bundle.js
    5. Start the Node.js server:

      node index.js
    6. Open another terminal, navigate to the Database_API folder:

      cd Database_API
    7. Start the FastAPI server:

      uvicorn main:app --reload --host 127.0.0.1
    8. In a new terminal, migrate the Truffle contract to the local blockchain:

      truffle migrate
    9. Access the Voting app at http://localhost:8080/.


    Code Structure

    blockchain-voting-dapp/
    ├── build/
    │   └── contracts/
    │       ├── Migrations.json
    │       └── Voting.json
    ├── contracts/
    │   ├── Migrations.sol
    │   └── Voting.sol
    ├── Database_API/
    │   └── main.py
    ├── migrations/
    │   └── 1_initial_migration.js
    ├── node_modules/
    ├── public/
    │   └── favicon.ico
    ├── src/
    │   ├── assets/
    │   │   └── eth5.jpg
    │   ├── css/
    │   │   ├── admin.css
    │   │   ├── index.css
    │   │   └── login.css
    │   ├── dist/
    │   │   ├── app.bundle.js
    │   │   └── login.bundle.js
    │   ├── html/
    │   │   ├── admin.html
    │   │   ├── index.html
    │   │   └── login.html
    │   └── js/
    │       ├── app.js
    │       └── login.js
    ├── index.js
    ├── package.json
    ├── package-lock.json
    ├── truffle-config.js
    └── README.md
    

    License

    This project is licensed under the MIT License.


    Star the Project

    ⭐ If you like this project, please give it a star!

    Visit original content creator repository https://github.com/akanksha509/Decentralized-Voting-System-Using-Ethereum-Blockchain
  • springboot-3-micro-service-demo

    Spring boot Micro Services

    Microservices sample project

    alt text

    This repository contains a demo project showcasing a microservices-based application, designed to provide a hands-on understanding of microservices architecture and implementation. The project consists of an API Gateway, Config Server, Discovery Server, and two microservices: Student and School.

    Table of Contents

    Getting Started

    Follow the instructions below to set up the project on your local machine for development and testing purposes.

    Prerequisites

    Ensure you have the following software installed on your system before proceeding:

    • Java Development Kit (JDK) 17 or later
    • Maven
    • Docker (optional, for containerization)

    Installation

    1. Clone the repository:

    git clone git remote add origin git@github.com:khalil-bouali/springboot-3-micro-service-demo.git

    1. Navigate to the project directory:
    2. Build and package each component with Maven:

    Project Components

    API Gateway

    The API Gateway serves as the single entry point for all client requests, managing and routing them to the appropriate microservices.

    Config Server

    The Config Server centralizes configuration management for all microservices, simplifying application maintenance and consistency across environments.

    Discovery Server

    The Discovery Server provides service registration and discovery, enabling seamless service-to-service communication within the microservices ecosystem.

    Student Microservice

    The Student Microservice is responsible for managing student-related data and operations, such as adding, updating, and retrieving student records.

    School Microservice

    The School Microservice manages school-related data and operations, including adding, updating, and retrieving school records.

    Inter-Service Communication

    Using OpenFeign

    This project demonstrates inter-service communication using OpenFeign, a declarative REST client that simplifies service-to-service communication within the microservices ecosystem.

    Distributed Tracing

    Using Zipkin

    The project showcases the use of Zipkin for distributed tracing, enhancing application observability and enabling the visualization and troubleshooting of latency issues.

    Contributing

    Contributions are welcome! Please read our CONTRIBUTING.md for details on how to contribute to this project.

    License

    This project is licensed under the MIT License.

    Contact

    [Khalil Bouali] – [khalil.bouali95@gmail.com]

    [LinkedIn] – [https://www.linkedin.com/in/khalil-bouali]

    Project Link: https://github.com/khalil-bouali/springboot-3-micro-service-demo

    Acknowledgements

    Visit original content creator repository https://github.com/khalil-bouali/springboot-3-micro-service-demo
  • react-spinners-components

    react-spinners-components

    Very easy to use loading spinners for React.

    NPM JavaScript Style Guide

    You can check the available loading spinners on the link below:

    Install

    npm install react-spinners-components
    

    or

    yarn add react-spinners-components
    

    Usage

    There is a total of 15 types of loading spinners: Ball, Blocks, Cube, Discuss, Disk, DualBall, Eater, Gear, Infinity, Interwind, Pulse, Ripple, Rolling, Spinner, Wedges. Please capitalize the first letter when inserting the type prop, e.g., Ball —> ‘Ball’.

    Please notice the following:

    • When the component accepts only one color —> prop is called color and accepts a single string, e.g., ‘red’ or ‘#f91a10’;
    • When the component needs more than one color —> prop is called colors and accepts an array of strings with the colors that it needs (check the examples to know how many colors each type needs);
    • The size prop needs a string. You can use any unit, e.g., px and rem, but if the unit is not stated, px will be applied by default. Examples: ‘150px’, ’10rem’, ‘150’;

    If no props are given

    • None of the props are required. If no props are given, the react-spinners-components will return the LoadingSpinnerComponent with the ‘Ball’ type, default color and size.

    • If props color(s) and / or size are not given, default values will be used for the missing props.

    Examples

    Loading spinner type ‘Ball’

    import React from 'react';
    import LoadingSpinnerComponent from 'react-spinners-components';
    
    const Example = () => {
      return(
        <LoadingSpinnerComponent type={ 'Ball' } color={ 'red' } size={ '100px' } />
      );
    };
    
    export default Example;

    Loading spinner type ‘Blocks’

    import React from 'react';
    import LoadingSpinnerComponent from 'react-spinners-components';
    
    const Example = () => {
      return(
        <LoadingSpinnerComponent type={ 'Blocks' } colors={ [ '#06628d', '#f91a10' ] } size={ '100px' } />
      );
    };
    
    export default Example;

    Loading spinner type ‘Cube’

    import React from 'react';
    import LoadingSpinnerComponent from 'react-spinners-components';
    
    const Example = () => {
      return(
        <LoadingSpinnerComponent type={ 'Cube' } colors={ [ '#06628d', '#f91a10', 'yellow', 'purple' ] } size={ '100px' } />
      );
    };
    
    export default Example;

    Loading spinner type ‘Discuss’

    import React from 'react';
    import LoadingSpinnerComponent from 'react-spinners-components';
    
    const Example = () => {
      return(
        <LoadingSpinnerComponent type={ 'Discuss' } color={ '#06628d' } size={ '100px' } />
      );
    };
    
    export default Example;

    Loading spinner type ‘Disk’

    import React from 'react';
    import LoadingSpinnerComponent from 'react-spinners-components';
    
    const Example = () => {
      return(
        <LoadingSpinnerComponent type={ 'Disk' } colors={ [ '#06628d', 'purple'] } size={ '100px' } />
      );
    };
    
    export default Example;

    Loading spinner type ‘DualBall’

    import React from 'react';
    import LoadingSpinnerComponent from 'react-spinners-components';
    
    const Example = () => {
      return(
        <LoadingSpinnerComponent type={ 'DualBall' } colors={ [ '#06628d', 'purple', '#06628d'] } size={ '200px' } />
      );
    };
    
    export default Example;

    Note: ‘DualBall’ can actually work like a ‘TriBall’ by using 3 different colors, example below:

    import React from 'react';
    import LoadingSpinnerComponent from 'react-spinners-components';
    
    const Example = () => {
      return(
        <LoadingSpinnerComponent type={ 'DualBall' } colors={ [ '#06628d', 'purple', 'yellow'] } size={ '200px' } />
      );
    };
    
    export default Example;

    Loading spinner type ‘Eater’

    import React from 'react';
    import LoadingSpinnerComponent from 'react-spinners-components';
    
    const Example = () => {
      return(
        <LoadingSpinnerComponent type={ 'Eater' } colors={ [ '#06628d', 'purple'] } size={ '150px' } />
      );
    };
    
    export default Example;

    Loading spinner type ‘Gear’

    import React from 'react';
    import LoadingSpinnerComponent from 'react-spinners-components';
    
    const Example = () => {
      return(
        <LoadingSpinnerComponent type={ 'Gear' } color={ 'purple' } size={ '150px' } />
      );
    };
    
    export default Example;

    Loading spinner type ‘Infinity’

    import React from 'react';
    import LoadingSpinnerComponent from 'react-spinners-components';
    
    const Example = () => {
      return(
        <LoadingSpinnerComponent type={ 'Infinity' } color={ 'purple' } size={ '150px' } />
      );
    };
    
    export default Example;

    Loading spinner type ‘Interwind’

    import React from 'react';
    import LoadingSpinnerComponent from 'react-spinners-components';
    
    const Example = () => {
      return(
        <LoadingSpinnerComponent type={ 'Interwind' } colors={ [ '#06628d', 'purple'] } size={ '125px' } />
      );
    };
    
    export default Example;

    Loading spinner type ‘Pulse’

    import React from 'react';
    import LoadingSpinnerComponent from 'react-spinners-components';
    
    const Example = () => {
      return(
        <LoadingSpinnerComponent type={ 'Pulse' } colors={ [ '#06628d', 'purple', 'blue'] } size={ '150px' } />
      );
    };
    
    export default Example;

    Loading spinner type ‘Ripple’

    import React from 'react';
    import LoadingSpinnerComponent from 'react-spinners-components';
    
    const Example = () => {
      return(
        <LoadingSpinnerComponent type={ 'Ripple' } colors={ [ '#06628d', 'purple'] } size={ '150px' } />
      );
    };
    
    export default Example;

    Loading spinner type ‘Rolling’

    import React from 'react';
    import LoadingSpinnerComponent from 'react-spinners-components';
    
    const Example = () => {
      return(
        <LoadingSpinnerComponent type={ 'Rolling' } color={ 'purple' } size={ '150px' } />
      );
    };
    
    export default Example;

    Loading spinner type ‘Spinner’

    import React from 'react';
    import LoadingSpinnerComponent from 'react-spinners-components';
    
    const Example = () => {
      return(
        <LoadingSpinnerComponent type={ 'Spinner' } color={ 'purple' } size={ '150px' } />
      );
    };
    
    export default Example;

    Loading spinner type ‘Wedges’

    import React from 'react';
    import LoadingSpinnerComponent from 'react-spinners-components';
    
    const Example = () => {
      return(
        <LoadingSpinnerComponent type={ 'Wedges' } colors={ [ '#06628d', 'purple', 'blue', 'yellow'] } size={ '300px' } />
      );
    };
    
    export default Example;

    References

    Author

    @kazimkazam

    Repository

    @Github

    @npm

    License

    MIT © kazimkazam

    Visit original content creator repository https://github.com/kazimkazam/react-spinners-components
  • ecs-task

    Tests

    ecs-task

    ecs-task is an opinionated, but flexible tool for deploying to Amazon Web Service’s Elastic Container Service.

    It is built on the following premises:

    • ECS Services, load balancers, auto-scaling, etc. are managed elsewhere, e.g. Terraform, Cloudformation, etc.
    • Deploying to ECS is defined as:
      1. Update task definition with new image tag
      2. [Optional] Running any number of one-off Tasks, e.g. Django database migrations.
      3. [Optional] Updating Services to use the new Task Definition.
      4. [Optional] Updating Cloudwatch Event Targets to use the new Task Definition.
      5. Deregister old Task Definitions.
    • Applications manage their own Task/Container definitions and can deploy themselves to a pre-defined ECS Cluster.
    • The ability to rollback is important and should be as easy as possible.

    Installation

    pip install ecs-task
    

    (Optionally, just copy ecs_task.py to your project and install boto3).

    Usage

    This module is made up of a single class, ecs_task.ECSTask which is designed to be extended in your project. A basic example:

    #!/usr/bin/env python
    from ecs_task import ECSTask
    
    class WebTask(ECSTask):
        task_definition = {
            "family": "web",
            "executionRoleArn": EXECUTION_ROLE_ARN,
            "containerDefinitions": [
                {
                    "name": "web",
                    "image": "my_image:{image_tag}",
                    "portMappings": [{"containerPort": 8080}],
                    "cpu": 1024,
                    "memory": 1024,
                }
            ],
        }
        update_services = [{"service": "web", "cluster": "my_cluster",}]
    
    if __name__ == "__main__":
        WebTask().main()

    You could save this as _ecs/web_dev.py and then execute it with python -m _ecs.web_dev --help

    usage: web_dev.py [-h] {deploy,rollback,debug} ...
    
    ECS Task
    
    positional arguments:
      {deploy,rollback,debug}
        deploy              Register new task definitions using `image_tag`.
                            Update defined ECS Services, Event Targets, and run
                            defined ECS Tasks
        rollback            Deactivate current task definitions and rollback all
                            ECS Services and Event Targets to previous active
                            definition.
        debug               Dump JSON generated for class attributes.
    
    optional arguments:
      -h, --help            show this help message and exit
    

    Class attributes

    A sub-class of ECSTask must include a task_definition to do anything. Any other attributes are optional. The following attributes are designed to be a 1-to-1 mapping to an AWS API endpoint via boto3. The values you provide will be passed as keyword arguments to the associated method with the correct Task Definition inserted. Any attribute that takes a list can make multiple calls to the given API.

    A few additional attributes are available:

    • active_task_count: (int) the number of task definitions to keep active after a deployment. Default is 10.

    • sns_notification_topic_arn: (str) the ARN for an SNS topic which will receive a message whenever an AWS API call is executed. This can be used to trigger notifications or perform additional tasks related to the deployment. The message is in the format:

        {
          "client": client,  # boto3 client (usually "ecs")
          "method": method,  # method called (e.g., "update_service")
          "input": kwargs,   # method input as a dictionary
          "result": result   # results from AWS API
        }
    • notification_method_blacklist_regex (re.Pattern) a pattern of methods to avoid sending notifications for. Default is re.compile(r"^describe_|get_|list_|.*register_task")

    Command Interface

    Each class is intended to be “executable” by calling .main(). Multiple class instances can be called in a given file by using:

    if __name__ == "__main__":
        for klass in [WebTask, WorkerTask]:
            klass().main()

    debug

    Just prints the value of each class attribute to the console. Useful if you’re doing some class inheritance and want to verify what you have before running against AWS.

    deploy

    The deploy subcommand accepts an additional argument, image_tag which is used to update any Container Definitions in the task which have the {image_tag} placeholder. It will:

    1. Register a new Task Definition
    2. Run Tasks (as defined in run_tasks)
    3. Update Services (as defined in update_services)
    4. Update Event Targets (as defined in events__put_targets)
    5. Deregister any active Task Definitions older than active_task_count (by default, 10)

    rollback

    1. Deregister the latest active Task Definition
    2. Update Services (as defined in update_services) with the previous active Task Definition
    3. Update Event Targets (as defined in events__put_targets) with the previous active Task Definition
    Visit original content creator repository https://github.com/lincolnloop/ecs-task